PDF Info:
Powerpoint Info:
1. Rock of Ages
2.
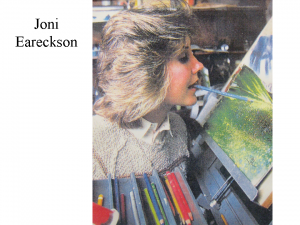
6. Joni working with pencil on “Higher Ground”
Just about every basic element of art is discussed in this packet. The Packet is a good example to help you pattern basic art concepts discussions with any other packets in this Rotation.
The pictures in this packet illustrate LANDSCAPE. This is a great opportunity to teach or review the element of SPACE in EVERY grade level (refer to EALRS spreadsheets for specific grade level discussion). Landscape creates a simple explanation (or review) of Foreground, Middle Ground and Background.
(Grades 1-5) Discuss or review LINE direction, horizon LINE, TEXTURE, FOCAL POINT (or EMPHASIS).
(All grades) Discuss different ways MOVEMENT can be created in LANDSCAPES (example—trees or grass bending in blowing wind, wandering river). Encourage and challenge kids to create movement with a landscape project.
Discuss and/or involve class in exercise creating “ABC’s of Art” with their teeth instead of hands. (See Rock of Ages for more specific explanation of this activity)
|
This packet was written with a lot of dialogue information concerning basics of LINE and COLOR. Don’t forget to point out how LINE is also made when two areas of COLOR meet each other. Refer to Packet 9. Landscapes for additional information to help with your dialogue and project ideas.
There are only a few watercolor paintings in this Rotation but most of the pictures in this packet are watercolors. Bring in an example of a landscape painted with oil paint. Compare the COLOR of these watercolor pictures with the oil painting. How is the COLOR different?
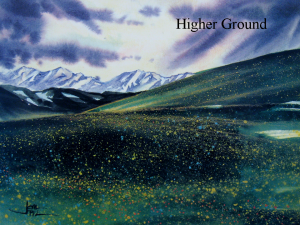
Higher Ground was created with colored pencil. How much time do you think it would take you to create a picture like this, using ONLY colored pencil? This picture also illustrates the spatial device of overlap quite well (grades 2-5).
Be sure ALL 7 Pictures are returned to the Packet Carrier after your Presentation is finished.
LANDSCAPE
A landscape is a picture of the outdoors. Landscapes usually include mountains, trees, plants, rivers, sky and any other element you might see if you looked out a window. Some landscapes include people, animals, buildings (barns, houses, sheds), roads or streets. Here are a few things to observe when you are looking at a landscape:
Does the painting show a certain MOOD or emotion?Does the painting have detail, or does it just give an impression of something?Does the painting look REAL or not very real (Expressionistic)?What is the season? Weather? Climate? What are the clues?What is the time of day?What is the period of time? Historic? Modern?Does anything in the painting show MOVEMENT?What do you “see”, “hear”, “feel”, or “smell” in the picture?If this artist could paint the landscape we see out of the classroom window, what details might he or she concentrate on, or include? What colors would the artist use? Would it look real or not?
PERSPECTIVE
In a landscape, an artist creates the illusion of a three-dimensional world on a flat, two-dimensional piece of paper. An artist does this by manipulating the SIZE, PLACEMENT and COLOR of the objects he paints. This is called PERSPECTIVE. Here are some things to remember about perspective:
SIZE—closer objects (Foreground) are larger than objects in the distance (Background).PLACEMENT has to do with the different areas of a picture—FOREGROUND (front of the picture, the area closest to the viewer), MIDDLE GROUND (center area of picture, not quite as close), BACKGROUND (things in the distance, on the horizon, that are farthest away from the viewer). FOREGROUND objects block out part of the things behind them (overlap). This helps fool our eyes into thinking that the things in the foreground are closer, or in front of the middle ground and background objects. FOREGROUND objects are found lowest in the picture. BACKGROUND objects are found near the top of the picture.The COLOR should get lighter, or fade in the distance (background) of a landscape. Objects that are closer (foreground) have more color. WARM CLORS (red, orange, yellow) draw the viewer’s eye forward. COOL COLORS (blue, green, violet) draw the viewer’s eye back.TEXTURES are more recognizable in the foreground. Textures become fuzzy, faint and harder to see in the distance.DETAIL is very important. The closer the object, the more detail the artist adds. Objects far away in the distance became simple SHAPES, with lighter color and no detail.The VANISHING POINT is a very important aspect of perspective. This is the point where the horizontal and vertical LINES meet. The vanishing point gives the picture an illusion of DEPTH, as if the scene could go on forever. The artist could also use the vanishing point to direct the viewer’s eye to a particular place in the picture.
SHADOW and SHADE
Another way an artist fools our eyes and makes a landscape realistic is by creating SHADOW or SHADE.
What creates a shadow or shade? Light
What creates the light in a landscape? The sun (or the moon, if it is an evening landscape)
Set out all of the Landscape pictures in the front. Have the class point out the shade and shadows in each painting.
Do ALL of the pictures have shadows and shade? Yes, because these are all REALISTIC landscapes.
Why would an artist add shadow or shade to a picture? To make it appear more realistic. Shadow and shade creates dimension, or DEPTH.
Joni Eareckson
(Pronounced “Johnny”)
(Born 1951) American
About the Artist
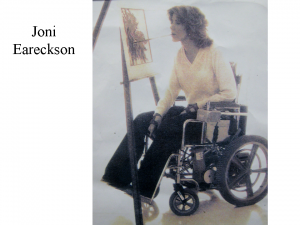
Joni Eareckson was born October 15, 1949, near Baltimore Maryland. She was named after her dad and had three older sisters. Joni now lives in California. She is an artist who has overcome many setbacks in her lifetime, to become a very inspirational individual, as well as an outstanding artist in her time. She is a quadriplegic, which means she has only the use of her head, not her hands and feet. Sitting in her wheelchair, Joni is about the same height as many children. If Joni could stand on her feet, she would be 5”8” tall. Joni became confined to a wheelchair after she broke her neck, by diving into water that was too shallow, at the age of 17. She can only move her shoulder muscles and head muscles now. (Ask students to sit very still and move only facial muscles.)
Before her accident, Joni did not know that she possessed such a wonderful artistic talent. About two years after her accident, Joni was encouraged to learn to write with a pencil wand in her mouth, so that she could be more independent, to sign papers and write letters. Joni was very frustrated and for many years she wondered why this had happened to her. She wanted to give up. Through her faith, Joni came to accept her condition. She now works to better herself and change the things she can change. Joni has many talents. With practice, and lots of hard work, Joni Eareckson bloomed into a wonderful, successful artist (she paints with her teeth), author, singer, company executive and public speaker.
Joni is married to Ken Tada, a high school history teacher. For vacation, Joni and Ken love to go tent camping in the Sierra Mountains. They do not have any children of their own. Joni Eareckson’s life story has been produced on video tape. It is titled “Joni” and stars John Ritter, as her boyfriend and husband. It may be available at video stores.
Some of Joni’s favorite things are driving her specially adapted van, butter-almond ice cream, horses, and flannel sheets. She also likes to read books and listen to classical music. Through Joni’s work at JAF Ministries, she helps others who are also disabled. Her ministry takes her across the United States, and around the world, teaching churches how to best help persons with disabilities.
Joni had some very big problems, but we each have our own problems in life. The next time you have a problem, when something is very difficult for you, remember to make the best of your situation, just like Joni Eareckson!
Some of Joni’s Story, in Her Own Words…
“For years, I was one of those who insisted, ‘Handicaps happen to other people, other families. Wheelchairs will never be seen in our home.’ I wasn’t being a snob, I was simply being realistic. My family was the athletic type, always up for a game of tennis or packing a knapsack for a hike. Why, my three older sisters and I never so much as sprained an ankle.
“All that changed on a hot, July afternoon, in 1967, when my sister, Kathy, and I went to a beach, on the Chesapeake Bay, for a swim. The water was dark and murky in the late afternoon sun and I didn’t bother to check the depth when I hoisted myself onto a raft anchored offshore. I positioned my feet on the edge, took a deep breath and plunged into the water. Sprong! My head hit something hard and snapped back. I felt a strange electric shock in the back of my neck. Underwater and dazed, I felt myself floating, drifting, and unable to surface to the top.
“My lungs were screaming for air, but just as I opened my mouth to ‘breath’ water, I felt my sister’s arms around me, lifting me to fresh air. ‘Kathy,’ I sputtered when I saw my lifeless arm slung over her shoulder, ‘I can’t feel!’
“A sunbather rushed into the water to bring his raft. Someone called an ambulance. Within an hour, nurses in the hospital emergency room were cutting off my wet bathing suit, rings and necklace. My head was spinning and I began to lose consciousness, when I heard a buzzing drill near my head.
“My diving accident catapulted me into the strange, frightening world of antiseptic smells, tubes and machines. For months I laid on a Stryker frame, a long canvas “sandwich” on which I was face up for several hours and then flipped face down, to prevent pressure sores. It didn’t help. I lost so much weight those first months that my bones literally began to stick through my flesh. That meant more operations and more months on the Stryker frame.
“Deep, dark depression set in. ‘How could you have allowed this to happen to me, God?’ I asked. ‘I was a Christian before my accident and if this is your idea of an answer to prayer for a closer walk with you, then I’ll never trust you with another prayer again!’
“Little did I realize that friends were praying for me around the clock. As weeks went on, I began to sense a difference. My anger was subsiding. My depression was slowly lifting. God, unbeknownst to me, was wearing down my resistance through the power and pressure of prayer.
“I really noticed the change in occupational therapy. Weeks earlier, I had stubbornly refused to learn how to write with a pencil clenched between my teeth. But that was before I met Tom, a young ventilator-dependent quadriplegic who was much more paralyzed than me. His attitude was buoyant and enthusiastic as he willingly permitted the therapist to put the pen in his mouth. I was ashamed of my grumbling and complaining.
“God used the prayers of my friends and the example of Tom to show me the truth of Romans 8:28, ‘In all things god works for the good of those who love Him.’ Maybe God’s idea of good for me might not include being back up on my feet, but His good would include a more flexible attitude, an appreciation of small things, a deeper gratitude for friendships, and a character which would reflect patience, endurance and joy that did not depend on circumstances.
“And now, more than 25 years later, I would say the same. It hasn’t been easy but God’s power and strength still comes shining through. Besides, He knows exactly how I feel. He once suffered, too. And because Jesus could turn his cross into a symbol of hope and freedom, can I do any less? My wheelchair is the prison God has used to set my spirit free!
Artistic Beginnings…
…”Some of my paralyzed friends at Green Oaks had been sent home. This gave me more hope, something to look forward to. I worked even harder at my own therapy. I wanted to go home, too.
“I was ready to try new things. ‘Now that you can write pretty well with your mouth, why not do something artistic?’ Chris Brown [Joni’s physical therapist] suggested.
‘Artistic?’ I asked. I wasn’t sure what she had in mind.
‘You’ve shown me the drawings you used to do. You can paint these ceramic discs. They make nice gifts.
‘I watched one of the other quadriplegics slop paint on a piece of clay, using a paint brush she held in her mouth. It reminded me of kindergarten again.
“I-I don’t know,” I said quietly.
“Oh, come on. Try it,” Chris urged.
I tried the painting, spilling globs of color, splashing clumsy designs on the clay discs. It was discouraging and frustrating. And messy. At first, I hated every minute of it.
“When the discs came out of the kiln, they didn’t look so bad. I was encouraged. I practiced. And I improved. After a few weeks, I had Christmas gifts for my family and friends. I didn’t know what they’d think of the candy dishes, but I thought they were pretty good, considering. And I had done them myself!
One day, Chris brought me some moist clay.
“What’s that for?” I asked.
“I want you to draw a picture on it,” she told me.
“How? With a pencil in my mouth?”
She shook her head. “Try this style.” She showed me a long wooden stick, pointed at one end.
“What should I make? Should I write something?”
Chris smiled. “Why not make something that you like,” she suggested. “Something to express yourself.”
I gauged the distance from my mouth to the clay and poked at it with the pointed end of the stick. Then I tried to etch something.
The last time I’d drawn anything was on our trip West, just before my accident. I had filled a sketch pad with drawings of mountains, horses, people and animals. I tried to remember how to draw.
I looked down at the sketch I’d done; a line drawing of a cowboy and horse etched in the soft clay. It wasn’t very impressive, but it was a beginning.
Chris was amazed by my first attempt. ‘Joni! That’s great. You’ve got real talent.’ She grinned. ‘You should have done this before. You have to get back to your art.’
‘That was when I had hands,’ I protested.
Chris shook her head. ‘Hands are just tools, Joni. The skill, the talent is in your brain. Once you’ve practiced, you’ll be able to do as well with your mouth as you did with your hands.’
‘Wow! Really?’
‘Yeah,’ Chris said. ‘Want to try it?’
It turned out to be a very satisfying day for me. For the first time in almost a year and a half, I was able to express myself in a creative, productive way. It was another reason to hope.
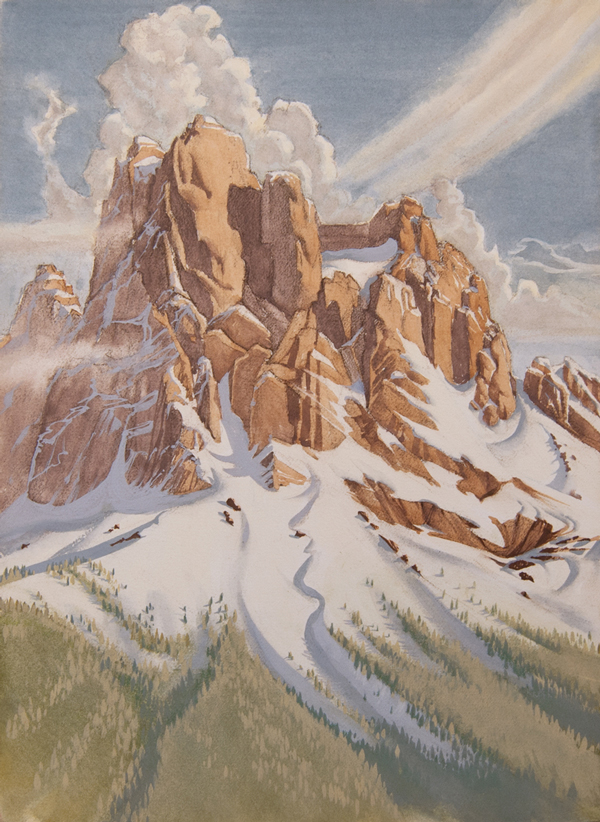
Rock of Ages
By Joni Eareckson
SUGGESTED DIALOGUE
Discuss MOOD—what feeling do you get when you look at this painting? Why?
Discuss FOCAL POINT—what is it? The area of a work of art that our eye goes to first
Artists have many ways of helping this happen. Two of them are COLOR and LINE.
Have the class look at the painting and then close their eyes. What color did they see first?
WARM COLORS (yellow, orange, red) attract our eyes first. They appear to come forward (rock). COOL COLORS seem to recede, or move towards the back of the picture (sky).
Discuss LINE—VERTICAL LINES in a painting give the main object a feeling of power and strength i.e. trees, mountains and buildings.
LINE can also strategically draw our eyes to a certain area within a picture. Point out the way that Joni used the LINES of the clouds, ridges in the snow, and the darker green areas representing trees, to lead our eye to the main FOCAL POINT (the large rock formation) in this picture.
ABC’s of Art
Everything in Art is created from these basics:
DOT CIRCLE LINE CURVE RIGHT ANGLE
PROJECT IDEA
Create a drawing similar to “Rock of ages”, using colored pencil and the ABC’s of Art (above). (Use your teeth.)
Discuss the “ABC’s of Art” with the class (above). Have the class fold a piece of rectangle paper into 6 equal parts (See illustration below). Draw a rectangle on the board and divide it the same way. Next, draw one symbol (dot, circle, line, curve, right angle) inside each of five squares, leaving the sixth one blank. In this last square, create a design using at least three of these five basics (dot, circle, line, curve, or right angle). Now, the interesting part of this exercise is that the class will do the same thing that you have just demonstrated, EXCEPT they will draw the different symbols using a pencil, felt pen, crayon, marker, or a paintbrush HELD IN THEIR TEETH. This will let the class have a chance to direct their attention to this artist’s extreme handicap, as well as gain a greater appreciation for Joni Eareckson’s artistic abilities. It is amazing what this artist can do, despite not having any hands to paint or draw with!
The exercise can either be the art project this month, or an addition to the project, since it doesn’t usually take long.
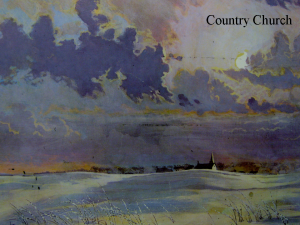
Country Church
SUGGESTED DIALOGUE
What is a LANDSCAPE? A picture containing an extensive view of the scenery, a picture of the outdoors, a scene you might see out your window
Discuss the location of the HORIZON LINE (where the sky meets the ground). Point out that the horizon line of a landscape is usually not found in the center of a picture. It is usually found just ABOVE or just BELOW the middle.
Which fills the largest area of this picture—the land or the sky?
Why do you think the artist did this? By making the sky fill up most of the picture, the church seems farther away.
Discuss the difference in the look of the TEXTURE of the sky and the TEXTURE of the ground.
Which is smooth and which is choppy? The ground is smooth snow.
How did the artists create this effect? The ground is created with long, sweeping strokes (HORIZONTAL LINES) of pale color.
Discuss the COLOR in this picture and the MOOD it creates. The picture is painted using mostly COOL COLORS (blue, lavender), along with white. This makes the scene appear cold. The icy, bending grass, in the FOREGROUND, creates MOVEMENT, as if there is a cold wind blowing. Everything is pale and cold. This scene also creates a very lonely MOOD.
Where else can we find MOVEMENT in this picture? In the clouds
PROJECT IDEA
Compose a drawing or painting in which part of the art has a smooth, calm TEXTURE and part has a more exciting section. This second part of the art can be created using TEXTURE, MOVEMENT, COLOR and/or LINE. Remember: HORIZONTAL LINE has a smooth, calm effect (the rolling hills of landscapes); VERTICAL LINE suggests power and strength (trees, mountains, buildings); DIAGONAL LINE suggests excitement and confusion. LINES help move our eyes through and around a painting.
Create a DISTANT LANDSCAPE by making sure that the HORIZON is low (close to the bottom) of the picture. Discuss PLACEMENT with the class, in terms of how it relates to DEPTH and PERSPECTIVE.
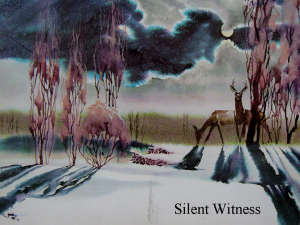
Silent Witness
By Joni Eareckson
SUGGESTED DIALOGUE
What time of day do you think it is? What clues give you that idea? The fog suggests that it is dawn and so does the yellow spot, partially hidden by the dark cloud. Yellow suggests sunlight; a moon is usually portrayed in white light.
Look carefully at the painting. What do you see? How would you describe the weather… calm or stormy, hot and humid?
Where does the light come from in this scene? Discuss the direction of the shadows. Can you see how the shadows angle out, in a V, from the source of the light? Discuss what the artist did to create the dark shadows. The dark watercolor seems to be watered down in places, so that the shadows are lighter and darker and spread, or feather out, in some areas. Notice how the shadows are narrow at the top and widen as they move down in the picture.
Can you find any SHAPES or PATTERNS in this painting?
J Use a flashlight and a ball to illustrate and demonstrate the concept of shadows
Shadow in front—light comes from directly behind
Shadow on one side—light comes from opposite side
Shadow above—light comes from below
Lighter shadows happen when the light comes from directly above
PROJECT IDEAS
Set up a Still Life scene; using a lamp or flashlight. Have class draw what they see, paying attention to the light source and where the shadows fall.
Thin brown tempera paint, with water, until it is very runny. Drip a puddle of this paint in the middle ground, on a vertical sheet of white construction or watercolor paper. Immediately use a straw to blow the thin paint, from the bottom towards the top of the page. As you blow on the straw, the paint will create thin lines, like branches from a bush or tree, moving up and out from the puddle (trunk). Blow the paint upwards and to the sides, to create a balanced design. Continue blowing on the paint until it stops moving. Use a small piece of sponge, dipped into the same paint and blotted along the tops of the tree limbs, to create foliage similar to the bushes and trees in this painting. Choose a direction that the light is shining from and create the correct shadow on the snow for your tree, using thin black paint, once your tree has dried.
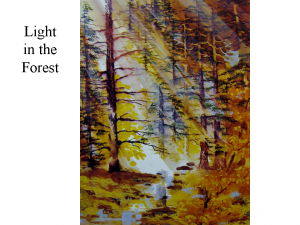
Light in the Forest
By Joni Eareckson
SUGGESTED DIALOGUE
Ask class to verbally describe the painting. List the things they see on the board, at the front of the room. (Rocks, trees, plants, a stream, streaks of sunlight)
What colors does the artist use, WARM or COOL? Warm
How do these colors affect the way the painting makes you feel (MOOD)? Answers will vary
Have you ever been in the forest for a long time? Did you notice how the light changes the way things look? Usually the trees cast shadows. Shadows darken the colors and change direction as the sun moves.
How can an artist paint shadows? By creating SHADES (adding some black to the colors) to create a darker VALUE of the colors.
Can you find any VERTICAL LINES in this picture? Tree trunks
Where are the Horizontal Lines? Branches extending out on each side of the tree trunks
Have you ever seen light coming through trees in a forest, the way it does in Light in the Forest?
In which direction do the LINES of light, or streaks of light, move across the picture? Diagonally
Diagonal lines suggest excitement or confusion. Which mood do you think the artist meant to create in this landscape, excitement or confusion? The light coming through the trees seems to suggest excitement, an awakening of the quiet, dark forest.
What time of day do you think it is? Just before or just after noon. At noon the LINES of light would come from straight above.
What MEDIUM do you think the artist used? (Watercolor paint) If you look closely at the trees, you can see how the watercolor has bled, to make the trees look a little bit “fuzzy”.
PROJECT IDEAS
Using watercolor, paint a single tree, using only your mouth. This will give kids an appreciation of the difficulty Joni has as she paints an ENTIRE FOREST, using only her mouth. Paint trees that are similar to the ones in this picture because they take only one VERTICAL LINE (for the trunk) and five HORIZONTAL LINES (limbs on each side of the trunk), to resemble the SHAPE of a tree. (Don’t forget to add a little color to the tree and create a background.) To make this easier, load the paint on the paintbrush and rinse the brush using your hands, and only paint with your mouth. This will cause less mess and take less time.
Run off copies of COLOR—SHADES AND VALUES (yellow page in master workbook) on cardstock and have the kids paint in the squares, mixing different SHADES of the colors. (This project recommended for grades 3-5.) Use tempera or acrylic paint, watercolors are too hard to work with on this project.
Higher Ground
By Joni Eareckson
SUGGESTED DIALOGUE
What is a LANDSCAPE? This picture is a LANDSCAPE (a picture of an outdoor scene). This picture is a good example for discussing FOREGROUND, MIDDLE GROUND and BACKGROUND. It is also a good example to use when discussing HORIZON LINE (where the sky meets the ground), or HORIZONTAL LINE with younger kids. HORIZONTAL LINES have a smooth, calming effect on the viewer (the rolling hills of LANDSCAPES).
LINES can help keep our eye in a painting by the direction in which they move. Point out the different LINES in the levels of this Landscape and how these LINES cause our eyes to move back and forth, from the FOREGROUND to the BACKGROUND of the picture.
What type of material (or, more correctly, medium) do you think Joni used to paint Higher Ground? Colored pencils
Show the picture of Joni working on Higher Ground. Discuss what it must be like to only use only your teeth to create such beautiful art work.
Are the flowers in the Foreground detailed? They are merely suggested, with tiny dots of color
Discuss COLORS in the picture and the way they make you feel. Are there more WARM (red, yellow, orange) tones or COOL (blue, green purple) tones in the picture?
PROJECT IDEAS
Have kids learn to write their name with a pencil in their mouth (all grades).
Create a Landscape with colored pencils.

