1.

Perspective:
The suggested project ideas that deal with PERSPECTIVE in this packet can be used with most of the pictures in this ENTIRE Rotation #3. FOREGROUND, MIDDLE GROUND, BACKGROUND, HORIZON LINE and CENTER OF INTEREST (FOCAL POINT) should be taught with ALL PACKETS, but especially with this packet. ALL students will benefit from your use of the proper vocabulary when discussing objects or happenings in these different areas of the Landscapes.
The sky, which is usually found in a Landscape, is an excellent example of NEGATIVE SPACE (grade 3). Kids could experiment with putting some type of unusual COLOR and PATTERN design in a Landscape sky to change it to a POSITIVE SPACE. Discuss how this EXPRESSIONISTIC idea changes the picture.
(All grades) Harvest, Sertig Valley and Mountain Serenity are all excellent paintings for discussing an artist’s personal choice of COLOR. These three landscapes were painted with fanciful color, in contrast to the realistic color of Wheatfields, Imaginary Landscape, The Turn in the Road, and Street Scene. The first three paintings listed in this paragraph are examples of EXPRESSIONISM and the other four are examples of REALISM. Compare and discuss the differences.
Is it okay for an artist to paint a Landscape with COLORS that are not realistic or natural? Of course, artists can use ANY colors that they want to. Kids can use any variation of COLOR in their pictures too. Unusual and surprising COLOR makes the viewer have to think about the picture more (and it’s just more fun!).
Any projects emphasizing the element of COLOR would work well with this packet. (Color Wheel, Tints or Shades)
Be sure ALL 7 Pictures are returned to the Packet Carrier after your Presentation is finished.
Landscape
A Landscape is a picture of the outdoors. It usually includes mountains, trees, plants, rivers, sky and any other element you might see if you looked out a window. Some landscapes include people, animals, buildings (barns, houses, sheds), roads or streets. Here are a few things to observe when you are looking at a landscape:
- Does the painting show a certain mood or emotion?
- Does the painting have detail, or does it only give an impression of something?
- Does the painting look real, or not very real?
- What is the season?
- What is the period of time? Historic? Modern?
- Does anything in the painting show movement?
- What do you “see,” “hear,” “feel” or “smell” in the painting?
- Pay attention to the artist’s STYLE—if this artist could paint the landscape we see out of the classroom window, what details might he or she concentrate on, or include? What COLORS would the artist use? Would it look photographic (realistic) or not (expressionistic)?
PERSPECTIVE
In a landscape, an artist creates the illusion of a three-dimensional world on a flat canvas or piece of paper. Artists do this by manipulating the SIZE, PLACEMENT and COLOR of the objects he paints. This is called PERSPECTIVE and here are some things to remember:
- SIZE—objects that are closer (foreground) are larger than objects in the distance (background).
- PLACEMENT has to do with the different areas of a picture—FOREGROUND (The area closest to the viewer or the bottom area of the painting), MIDDLEGROUND (Center area of the picture, things are not as close), BACKGROUND (Things in the distance, on the horizon, that are farthest away from the viewer and the highest area in the picture).
- OVERLAP—Foreground objects can block out part of the things behind them. This helps fool our eyes into thinking that the things in the foreground are closer, in front of the background objects.
- COLOR should fade in the distance (background) of a landscape. Objects that are closer (foreground) have more color. Warm colors (shades of red, orange, and yellow) draw the viewer’s eyes forward. Cool colors (shades of blue, green, and violet) draw the viewer’s eye back across the canvas.
- TEXTURES are more recognizable and detailed in the FOREGROUND. Texture becomes fuzzy in the distance.
- DETAIL is very important. The closer the object, the more detail it has. Objects in the distance often become only simple shapes with color.
- The VANISHING POINT is a very important aspect of perspective. This is the point where the horizontal and vertical lines of the picture meet. The vanishing point gives the picture an illusion of DEPTH, as if the scene could go on forever. The artist could also use the vanishing point to direct the viewer’s eye to a particular place in the picture.
SHADOW and SHADE
Another way an artist fools our eyes and makes a landscape realistic is by creating SHADOW or SHADE. What creates a shadow or shade? Light What creates the light in a landscape painting? The sun (or moon if it is an evening landscape)
Set out all of the landscape pictures at the front of the room. Ask kids to point out the shade and shadows found in each painting. Do ALL of the pictures have shadows and shade? Only the real looking pictures. The brightest and most colorful landscapes are more animated, maybe even a little cartoonish, or make believe. These expressionistic pictures are flatter because they don’t have shadows or shade.
Why does an artist add shadow or shade to a picture? To make it look more realistic. Shadow and shade create an illusion of dimension or depth in the picture.
J SUGGESTED SHADOW DEMONSTRATION
Darken the classroom. Use a flashlight and a ball to illustrate the following concepts:
- A shadow directly in front of the object means the light source comes from directly behind the object.
- A shadow on the side of an object means the light is coming from the opposite side.
- An almost invisible shadow means the light is directly above the object.
- A shadow above the object means the light is shining from below the object.
Demonstrate by placing something (like a light colored box) directly behind the ball, for the shadow to fall on, before you begin. You might also place the ball on a table against a wall. Ask the kids if they can tell you the direction each different shadow that you demonstrate would be drawn or painted. You might demonstrate this on the board at the front of the room. The suggestion to use a ball is because a ball is very easy to draw and won’t take attention away from what is going on with the shadows.
Consider having the kids fold a piece of paper into quarters. As you hold the flashlight in the four different places, the kids could draw the shadow and label the direction the light came from. This becomes a reference sheet to use with their own drawn or painted landscape, to help them add shade and shadows. (Fourth and Fifth Grade)
REAL VERUS UNREAL
Can you think of a type of picture that looks very real? A photograph, movie, DVD or video
Can you think of a type of picture that looks very unreal? A cartoon, comic book, coloring book
In the early days of painting and art, artist did what photographers do now. There were no cameras so artists were commissioned (or hired) to paint pictures of families or individuals. This way the people wouldn’t be forgotten when they moved away or died. Artists were also paid to paint special events or places that people wanted to remember. Artists might make mistakes here and there that would make the picture look a little bit different from the person or scene the artist was trying to recreate. Before cameras, paintings were the only way to keep a visual record of anything, so artists tried to make their pictures look as realistic as possible.
Today, we use a camera to take photographs of scenes or people. Photographs reproduce the scene EXACTLY the way they looked in real life. A photograph doesn’t make the little mistakes an artist might. After cameras were invented, in about 1830, artists started to experiment with showing things in ways that a camera couldn’t. Some artists deliberately made things look unreal.
Many of the landscape paintings in this packet are painted in a very realistic style, yet some of them are not. As you show the different pictures, remember to ask if the scene looks real or unreal. It is interesting that the painting Imaginary Landscape looks realistic because it is NOT an actual place.
Why wouldn’t an artist want their picture to look as realistic as possible? An artist might want to create a certain mood or feeling. An artist might want to make the viewer think or look again at the picture. An artist might just want to have fun and play with his painting.
Areas of a Landscape
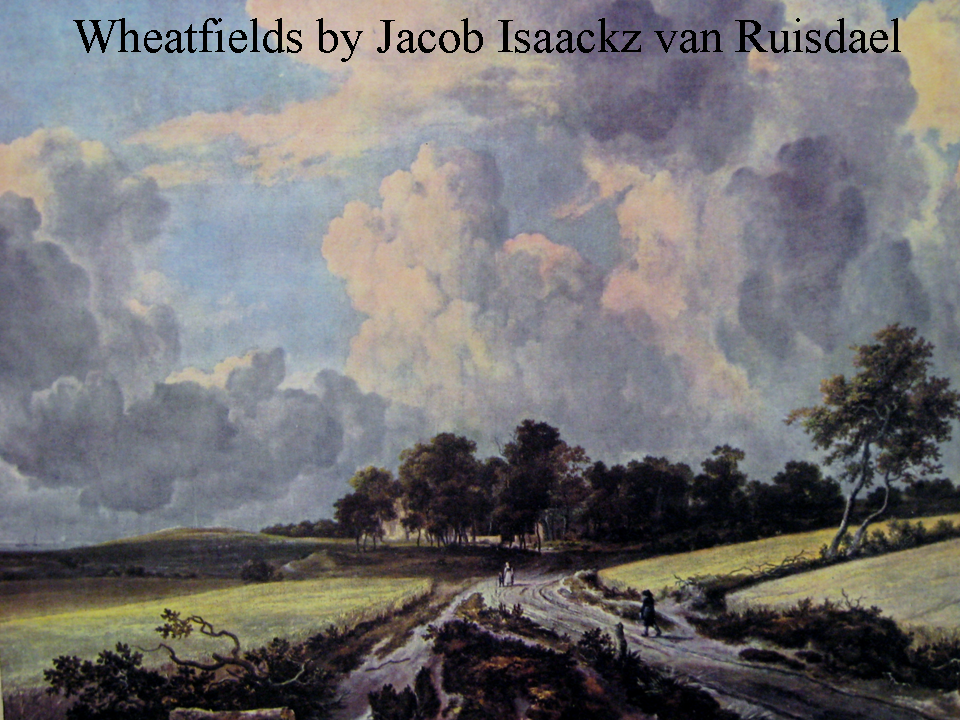
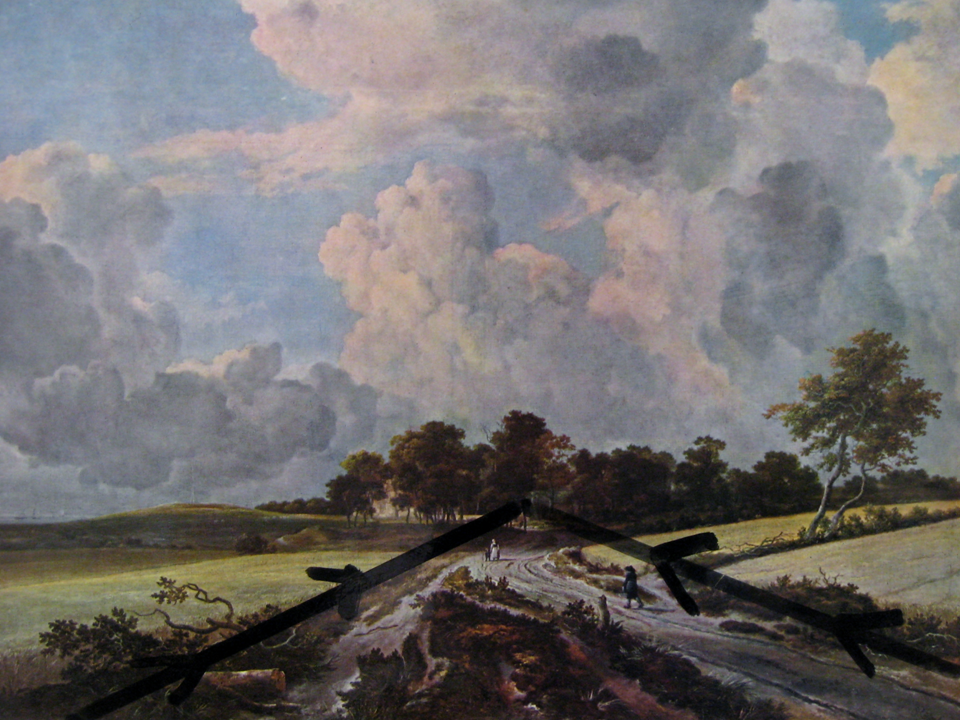
Wheatfields
By Jacob Isaacksz van Ruisdael (Ruysdael)
(Dutch 1628-1682)
ABOUT THE ARTIST
Ruisdael was born in Haarlem, Holland, in 1628. From his birth, Jacob was surrounded by an intense world of art. Ruisdael’s father was an art dealer and sometime artist. Jacob’s uncle was a leading landscape painter and also his cousin. Jacob probably learned painting from his father or uncle. He specialized in landscapes and his earliest paintings were painted when he was 17 or 18 years old. Jacob painted well enough to be permitted to join the quite strict Haarlem Artist Guild, in 1648, at the age of 19 or 20.
Jacob settled in Amsterdam around 1656 and lived there until his death, in 1682. He never married and had no children. Jacob paid close attention to the details in his paintings. An art critic once stated, “[Ruisdael] sought heroic effects without sacrificing the individuality of each oak … and clod of earth.”
ABOUT THE ART and SUGGESTED DIALOGUE
This landscape is one of Jacob Ruisdael’s finest achievements. It is an example of his feelings for the grandeur of space and the everyday world of nature. Ruisdael’s goal in this picture was to create space. Notice how the transition, from foreground up into the sky, is easy and uninterrupted. Artists make their landscapes much more interesting when they place their horizon lines above or below the center of the canvas. Notice how Jacob didn’t cut this picture in half at the skyline. The skyline, or horizon line, is about a third of the way up from the bottom of the picture.
What do we mostly see in this picture? What is the largest thing? The enormous sky
The picture invites us to come into it, to walk around and explore. The artist catches our attention with the wide, vertical road that begins in the FOREGROUND. The road takes our eyes back to the horizon, beyond the trees, which takes us back to the VANISHING POINT. (Grades 4 and 5—Show the smaller version of this picture, with the lines explaining perspective with a vanishing point.)
In the middle ground of the picture, just below the vanishing point, there is a woman walking with a young child. Can you see any other people? There is a man walking towards them, just lower in the middle ground and to the right. Why is the man so much larger than the woman and boy? (Hold something next to the people to compare their sizes.) The artist has used RELATIVE SIZE to give us the perspective that the man is closer to us than the woman and boy.
If we look in the farthest distance of the picture (background), in the very center behind the trees, there is some type of wall or fence and what looks like a large building or home. Maybe the woman and child are out to welcome father home from a long trip? Maybe they are welcoming him home from working in the Wheatfields (notice the TITLE of the painting)?
The clothing of the people looks very old fashioned and gives us clues to the period of history in which this picture was painted. What is the woman wearing? A long dress with an apron and hat What is the man wearing? A wide brim hat and dark clothing What is another clue about the period in which the picture is painted? We know the years of the artist’s life—the 1600’s.
PROJECT IDEA
- (Grades 4-5) Create a one-point perspective landscape using a vanishing point, horizon line and two converging vertical lines. (See “Create a One-point Perspective Scene”) Kids could tear distant mountains from dark blue or violet construction paper (these cool colors recede into the background). Glue the torn mountains, horizontally on light blue paper, with a small open space in the center. This open space will become the vanishing point. Glue tan or brown paper on the bottom two thirds of the picture. Draw a railroad track, a road or a stream, that disappears into the distance, on the middle ground and foreground of the picture. Add details such as trees, rocks, animals, buildings, etc.
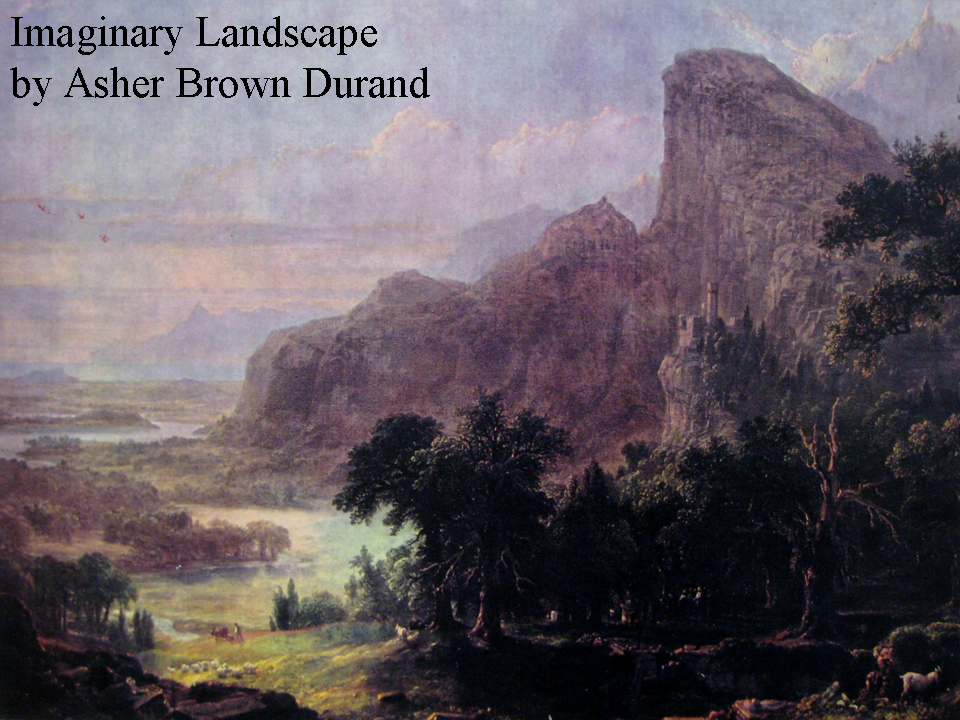
Imaginary Landscape
(Oil, 1850)
Asher Brown Durand
ABOUT THE ARTIST
Asher Brown Durand was born in Jefferson Village, New Jersey, on August 21, 1796. He was the eighth of eleven children. Asher’s father was a watchmaker, silversmith, farmer and a “universal mechanic”, which meant that he was very good at figuring out how to do things with his hands. When Asher wasn’t in school, he kept busy in his father’s workshop, making metal trinkets and engraving designs on copper plates. Apparently, he had inherited some of his father’s mechanical ingenuity because Asher invented and made his own tools to use.
Asher’s father apprenticed his son to work with a steel engraver when he was 16. He worked there for five years. Asher’s main responsibility was to draw copies of the illustrations, found in English books, and engrave these illustrations onto steel plates, so that American publishers could print them. These metal plates worked on printing presses in much the same way a rubber stamp prints a picture. The engraving plates were first covered with ink and then pressed on the paper to produce multiple copies of the same drawing. Asher was extremely talented and soon became better then the teacher he had been apprenticed to. He made a very successful living as an engraver.
Asher Durand lived in New York City for 54 years and was one of the most popular landscape painters of his generation. In 1869, Asher retired and moved from New York City back to a quiet country home in Jefferson Village, New Jersey, where he had been born. Asher died there in 1886, at the age of 90.
ABOUT THE ART
Sometimes Durand painted fantasy or make-believe landscapes like this, but he is best known for his views of specific real places. In nature Durand found, “A beautiful composition without need of change or adaptation.” In other words, he thought that nature was beautiful just as he saw it. Durand tried to show the truth of nature in his paintings. He saw the need to express convincingly, the exact species of the plants and animals of a region and to accurately show the effects of light and atmosphere in a scene.
In Imaginary Landscape, Durand has glorified nature. His imaginary mountains recede in ranges of pinnacles (pointed towers). Point out the way the pointed mountaintop on the right moves across the distant background, towards the left. To the left of the painting, we see a river that stretches and twists from the foreground into the background. Both are examples of MOVEMENT in a painting.
The sky in the distance is pink, what does that tell us? It is either sunset or sunrise.
Can you find the castle on the rocky cliffs? Just above the trees. If you don’t look closely enough, the castle blends into the cliffs behind it. Who do you think lives in the castle? Remember, this is an imaginary landscape, so it could be anyone or anything.
Point out some of the many details found in this picture. Left of painting shows a river that stretches and twists from the foreground into the background. A goat is in the far right foreground. Farther left in the foreground is a goat under a tree and a flock of sheep. Closer to the river is a man plowing a field with an ox. In the darkest area of the picture (shade under the trees) are white spots that may be people.
Discuss the way the many details of the landscape could be easily overlooked without taking time to really STUDY the picture.
PROJECT IDEA
- (Grades 3-5) Write an imaginary story about who lives in the castle of Imaginary Landscape and illustrate it. Be sure everyone can find the castle in the picture. Who might live in the castle—a witch, a selfish king, a kind and generous queen, a dragon, a lonely rich man, a lonely rich child, an elf, a fairy, a gremlin, a monster? Give a few suggestions to get the class started. Attach the story to the illustration and display.
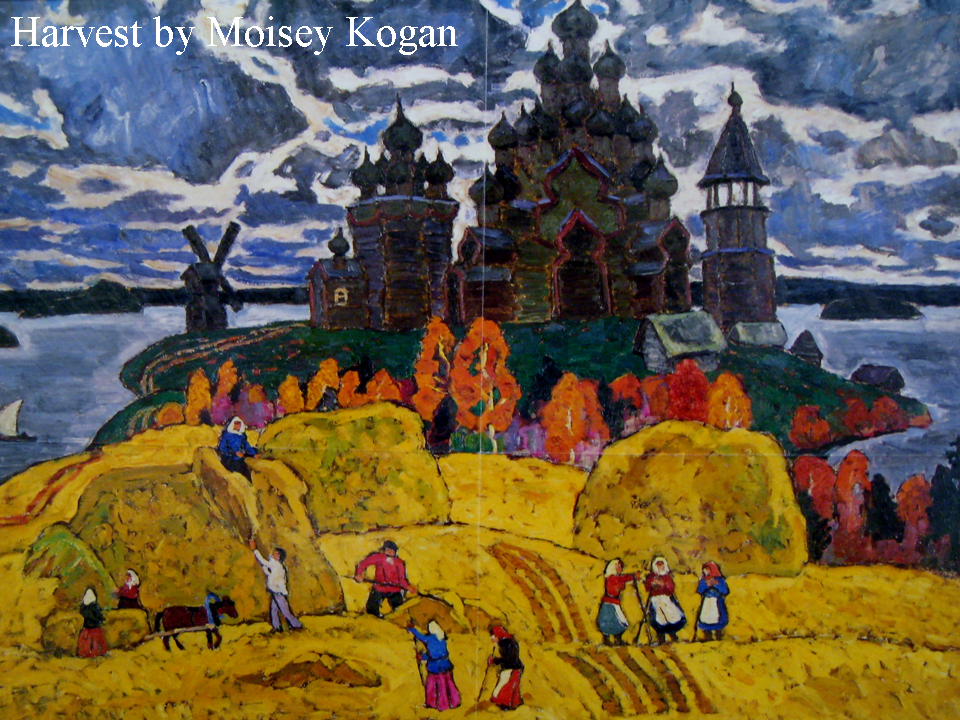
Harvest
By Moisey Kogan
ABOUT THE ARTIST
Moisey Kogan was born in 1924, in the Ukraine. As a young man, Kogan traveled throughout the Soviet Union. In his travels, Moisey studied landscapes, architecture (buildings), and people and made them the subjects of his art. In 1977, Moisey Kogan immigrated to the United States with his family and now lives and paints in New York City.
ABOUT THE ART
In the far north Karelian Province of Russia sits Kizhi Island, on Lake Onega. The church there has wooden “onion” domes and is called the church of the Transfiguration. Set in front of the church, golden grain fields wait for autumn’s harvest. When the times arrives, women wearing tall headdresses and men in brightly colored shirts cut, rake and stack the golden grain. The mule hauls the grains, which will become the breads, pastries, or cooked grain (kashas) eaten after work is done. The fall harvest brings the rhythm of peasant life alive in Moisey Kogan’s painting.
Harvest depicts a collective farm, where several families from a village work together and collect a portion of the profits earned.
Artists can alter space and trick viewers into believing there are miles of landscape on a flat canvas. In Harvest, the viewer’s eyes are carried across the golden fields, back to the belt of trees, and beyond to the island, where chalets and a Byzantine spired church sit.
If we were to cut along the line that divides the land from the shore, the scenery and the architecture would fit in a large triangle. An artist uses triangular arrangements to create depth.
Notice that the warm colors (the ocher field, the red and pink shirts of peasants, the orange foliage, and the deep brown architecture) cover the inside of this triangle and draw the viewer’s eye forward. Cool colors (the blue-gray clouds, the background’s blue-black landmass, and the steely cold lake where a lone boat sails) surround the triangle of warm tones and draw the viewer’s eyes back across the canvas. Together, specific arrangements and the use of COLOR create a sense of great space.
Kogan has been called a painter-storyteller. Another storyteller greatly influenced by Russian peasant life was Leo Tolstoy. Tolstoy wrote hundreds of stories for beginning readers. Read “Lipuniushka,” from the collection Twenty-Two Russian Tales for Young Children by Leo Tolstoy, edited Miriam Morton (Simon and Schuster, NY, 1969). The book’s harvesting illustrations provide nice comparisons with this painting as well.
PROJECT IDEA
- Construct a farm diorama. Use colored modeling clay, fabric scraps, and natural objects such as twigs and grass. Discuss the common way grain is harvested with machines in the United States compared to the way these peasants are harvesting. Find photographs of farming machines at work for the kids to model in their dioramas. Farm animals could also be sculpted in the scene.
Sertig Valley
By Ernst Ludwig Kirchner
ABOUT THE ARTIST
Ernst Ludwig Kirchner was born in Germany, in 1880. Ernst was an architectural student and first became interested in art when he visited the city of Nuremberg, Germany. There he saw some traditional German engravings, which inspired him to try etching. Eventually this led to painting. His painting was influenced by the Norwegian Expressionist, Charles Munch, and his interest in African and Oriental art. These influences caused Ernst to simplify the SHAPE and COLOR of his painting. He created large, flat (without shadows or highlights) areas of color that were often unexpected and unusual. The SHAPES of things he painted (people, trees, buildings, etc.) were very simple and unrealistic. Kirchner was an EXPRESSIONIST painter.
In 1907, Ernst graduated from architectural school and moved to Berlin. While living in Berlin, between 1911 and 1914, he painted his most famous pictures. Being a German citizen, Kirchner enlisted in the German army during WWI. While serving in the army he became seriously ill. A year later he left the army and Germany, and moved to Switzerland because he thought it would help him regain his health. While he was living in Switzerland, Ernst began to paint the mountain landscapes of the Swiss Alps. For many years he continued to suffer from poor health and live in Switzerland, where he died in 1938.
SUGGESTED DIALOGUE
This painting is a picture of a community in the mountains of Switzerland.
Is this a realistic picture? No, the artist did not try to make the picture look realistic, like a photograph. It is an example of EXPRESSIONISM.
What did Kirchner do to change the realism of this picture? It is painted with unusual colors—blue and orange trees; pink green and yellow snow; dark green sky. The trees are colorful, abstract shapes—especially the ones in the distance. The people in the foreground are not painted with much detail and are mostly expressionistic colorful shapes.
What are the people doing? There are two sleds that look like they are being pulled by horses. A person is following the sleds on skis.
How many buildings can you find? There are many more buildings than you realize when you first look at the picture. The actual number doesn’t matter, just have the class study the picture to find the buildings. Many are not obvious. Notice the shapes on the far right mountaintop of the background. These could be buildings. There are many buildings in the middle ground and also in the right foreground.
PROJECT IDEAS
- Paint a winter landscape using unusual shades of white for the snow. Start with white paint and add a tiny dab of blue. Paint another mountainside with white and a little pink or violet. Always start with white and add a small dab of color. Paint pine trees unexpected colors—blue, orange or purple. Paint a few pine trees green. Paint colorful building shapes with white, show covered roofs.
- Create a torn paper landscape. Tear background mountains from white, yellow or pink paper. Glue to a dark green background. Tear triangle tree shapes from other bright and usual colors. Tear small squares or rectangles from assorted colors for buildings. Add white triangles for the snow-covered roofs. Create the entire picture by tearing the paper, NOT CUTTING.
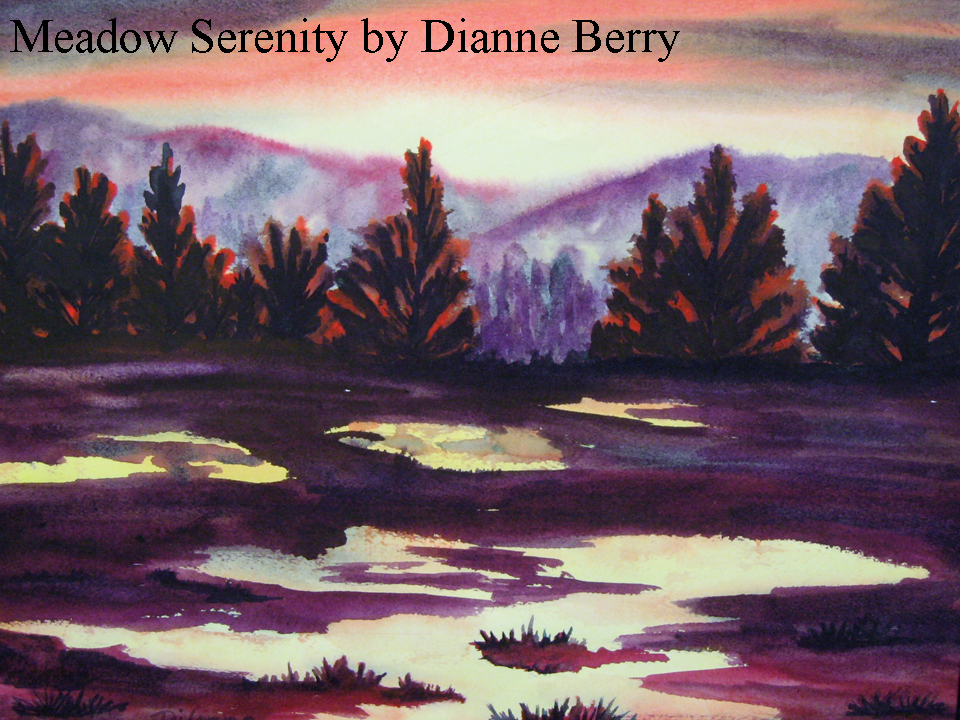
Meadow Serenity
By DiAnne Berry
(Local, Clark County artist)
ABOUT THE ARTIST
DiAnne was born and raised on a dairy farm, in Brush Prairie, north of Vancouver, Washington. She began painting as a young mother but put her paints away for 20 years, until after her children were older. DiAnne feels that expressing yourself with art is a fun and fulfilling way to open your mind. She has a love for art and has explored many forms of expression, from writing, beadwork and rock hounding, to sculpting and painting her own porcelain dolls. Yet, DiAnne has always come back to painting. When DiAnne discovered that watercolors did not have to be pale, pastel, flower paintings, she began experimenting and painting bright and exciting watercolor pictures. She especially enjoys the fact that watercolors dry fast!
DiAnne takes much inspiration from the world around her. She can find fascinating things to paint, from a scenic panorama (landscape) to a single flower, to the way the sun lightens a leaf. DiAnne doesn’t try to make her pictures look exactly real, like a photograph, because she feels that is what cameras are for. It is more important to her to create feelings or moods with her paintings.
Dianne’s greatest fascination with watercolor painting is in portraying people (portraits). Learning to paint and portray people continues to be a life long study for her. She feels the human face has so many subtle expressions that you can never catch them all and that painting a portrait is really very tricky. Dianne feels there is a very delicate balance in a painting that is able to capture the essence of a person, without making the painting too realistic, like a photo.
ABOUT THE ART AND SUGGESTED DIALOGUE
This landscape painting was a study of COLOR and SHAPE. DiAnne created this watercolor painting using only THREE COLORS.
Which three COLORS do you think the artist used? The color ORANGE and the complimentary colors YELLOW and PURPLE.
Discuss Complimentary Colors with 4th and 5th grade classes. Complimentary colors are found across from each other on the color wheel. Complimentary colors intensify one another when placed together. Complimentary colors are sets of a PRIMARY color and a SECONDARY color. There are three sets of complimentary colors: red and green, yellow and violet, and blue and orange.
What are the complimentary colors in this picture? Yellow and violet
The trees in this picture are triangle shapes, painted using the colors purple (violet) and orange. The trees look like dark shadows, with the orange reflection of sunset on the tips of the needles.
The artist painted this picture using wet watercolor paper. She used a lot of water on her paintbrush when she painted the hills behind the trees. It gives the hills a soft, fuzzy look. When you use more water with watercolor paint, the paint spreads and lightens, to create softer lines. When you use less water with watercolor paint, the lines are straighter and the color is more intense.
What color are the hills in this picture? Violet (purple) The artist made the background hills lighter than the meadow in the foreground. Colors move into the background when they become pale. Darker colors move forward and appear closer to the viewer. When violet (purple) is thinned with lots of water, it may separate into the two colors that created it. Can you tell the two colors you mix together to create purple? Red and Blue Can you see these two colors (red and blue) on the hillside? The background paper was wet, as well as the artist’s brush, and caused the color to separate a little.
Where did the artist use yellow? In the sky, along with orange, for the sunset. The sky also has streaks of clouds that were created with purple. The yellow in the foreground is found in the puddles that reflect the yellow light of the sunset.
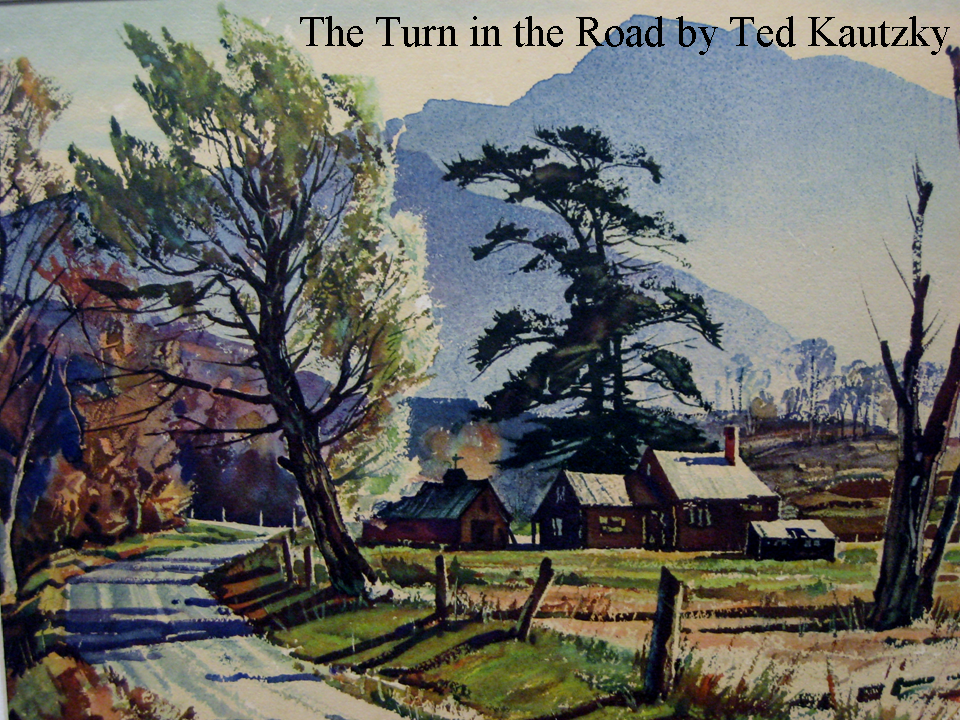
The Turn in the Road
By Ted Kautzky
(Watercolor)
ABOUT THE ARTIST
Ted Kautzky was born in Budapest, Hungary, in 1896. His father was a designer of wrought iron, and wanted Ted to follow in his footsteps. But Ted had different ideas. As a young boy, he loved to paint and draw. Ted especially loved to draw buildings and landscapes. At first, he just drew with a pencil but eventually he began using watercolor to make the drawings have realistic effects. Ted’s love of building forms led him to study architecture at the Royal University in Budapest. Architects draw and design buildings. Ted received his Architectural Degree in 1921 and was hired by one of the leading architects of Budapest for his very first job. It didn’t take long for his fellow workers to realize that Ted had exceptional talent for a young, beginning architect.
One day the office news was about a big international competition. The architects of the world were invited to compete for the honor of designing the proposed new Chicago Tribune Tower, in the United States. The most distinguished designers in every country were attracted by the skyscraper problem and by the large amount of prize money offered. It was an opportunity to win worldwide fame. Ted decided to submit a design, which he put all of his creative skill into. Ted worked with another architect and they sent in a magnificent set of drawings. The top award went to an American team of architects. A famous Finnish architect won second prize. Ted, who was only two years out of architectural school, had accomplished the remarkable feat of winning an Honorable Mention, which was more than many of the well known and long-established architectural firms of Europe and America had been able to do!
Participation in the competition had involved much reading and study about America. Ted became fascinated with the idea of going to America to work. In late 1923, Ted sailed for New York, at the age of 26, to seek his fortune. He quickly became successful in America. Ted met and married his wife, Ruth, in America. They were married the week before Christmas, in 1925. Ted became an official American citizen and then came The Great Depression. Architects and artists had a hard time finding work during this time. Architects need to practice their drawing skills. Ted spent a lot of time out in nature, sketching trees and plants, to help keep his architectural pictures looking their best. Ted’s talent and hard work made it possible for him to keep getting work during the hard economic times of the Depression. Ted always sent part of the money he earned back to his family in Hungary.
Ted was very successful as an architect and a landscape artist throughout his lifetime. He made a very good living with his talent. Ted was also a very successful Landscape painter. He painted many landscape pictures for calendars and books and won many top awards in exhibitions and competitions. Ted Kautzky died in 1955.
SUGGESTED DIALOGUE
Discuss the time of day in this painting. Notice the way the shadows fall. Where is the light coming from? Is this a scene in the country or in a town? What do you think is around the turn in the road?
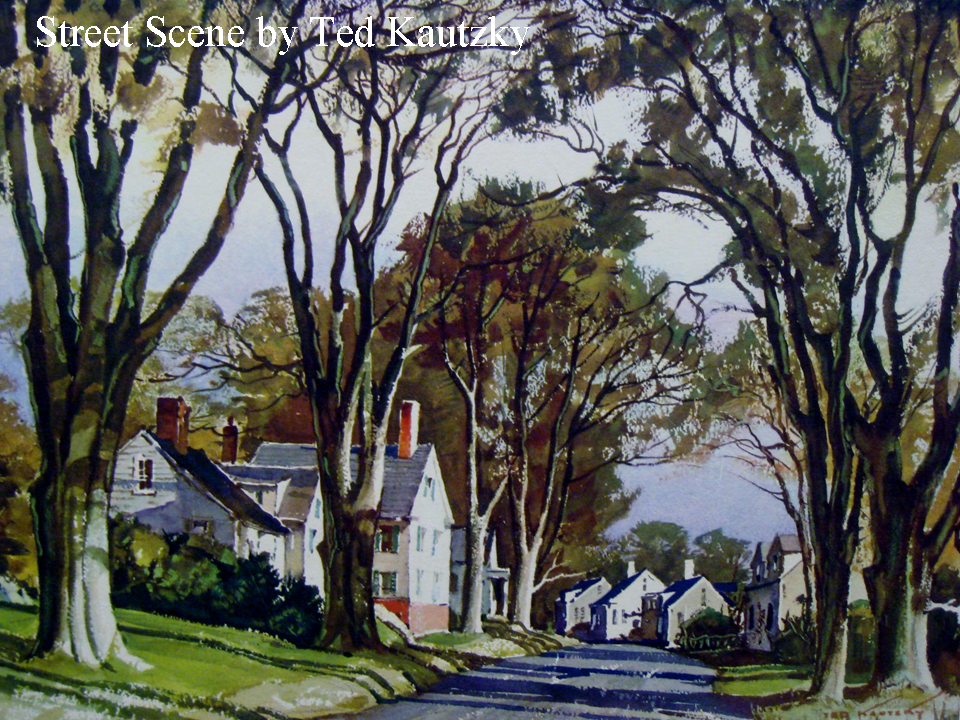
Street Scene
Ted Kautzky
(Watercolor)
Is this landscape different from Ted’s other painting? How? This scene is in a neighborhood in a town. There are many houses and many tall trees.
Point out the direction that the shadows fall in this picture and compare these to The Turn in the Road. Where is the light coming from?
This is a very neat and tidy neighborhood. Would you like to live in a place like this? Would it be a nice place to take a walk or ride your bike?
Create a One-Point Perspective Scene
It’s easy to draw in one-point perspective. Here’s how!
(This is a good project for 5th, 4th, and some third grade classes.)
1. Turn your paper so that it is horizontal (“landscape” orientation).
2. Draw a horizontal line across the width of the page, just above or just below the center. This is your HORIZON LINE. A landscape is more appealing when the horizon line is NOT in the exact center of your page.
3. Place a dot in the center of your horizon line. This is your VANISHING POINT.
4. Draw two vertical lines that start at the vanishing point and extend off the paper. This could be a sidewalk, road, river, or railroad track.
Add trees, bushes,
Mountains or
Buildings to finish
the Landscape.
5. Now, add the details to your landscape. Remember—larger things move forward in the picture, smaller things move back; background objects are paler in color, foreground objects (those closer to the viewer) have more color.
Perspective
Large vs. Small
(This is a good project for K-3)
Illustrates three very simple ways an artist creates Perspective—SIZE, COLOR and PLACEMENT.
Choose a background paper and lay it horizontally. Choose a different color foreground paper and cut it in half horizontally. Take only one of the foreground pieces and glue it to the bottom of the background paper. Now you should have a single piece of paper that has a different color on the top (background) and the bottom (foreground). Discuss that the foreground is found at the bottom of the picture and is the area closer to the viewer. The background is always farther away and is found at the top of the picture.
Define PERSPECTIVE—how an artist gives the illusion of a three-dimensional picture on a two-dimensional space. Stress that closer objects are larger than objects found in the distance of a landscape. Discuss how an artist uses SIZE to fool the viewer’s eyes into thinking that a smaller object is farther away. Discuss how COLOR fades on objects in the distance (smaller and higher in the picture) and how objects that are closer (larger and lower in the picture) have more color.
For this project, you will draw an object in 3 different sizes—large, medium and small. Color the three objects. The largest object has the brightest color, the medium object is a bit lighter and the smallest object is colored very lightly. Cut out the three objects as close to the outline as possible. Glue the 3 objects on the paper. REMEMBER—the largest object is placed at the bottom of the paper, or foreground (closest to the viewer). The medium sized object is placed a little higher on the paper (this object is a little farther away than the largest object), and the smallest object is placed even higher than the other two objects (it is farthest away from the viewer, but not in the sky) in the background.