1.

2.
3.
4.
5.

6.
Packet Extras:


This Packet also contains a short and interesting video showing the artist (Sharon Anhorn) at work.
The REPOUSSÉ artwork in this packet is actually Bas (pronounced bah) Relief or Low Relief SCULPTURE. To see examples of Relief Sculpture refer to the “Types of Sculpture” page in this packet. This type of sculpture is created using mostly LINE and FORM. The artist uses thin sheets of copper, gold and silver, to create sculptural works of art. The images are created on the metal by pushing on the design from the back. Most of these sculptures are first created with a simple LINE picture. On the video, we are able to see how the artist uses a pointed tool, to outline the SHAPE of her picture, on the back of the sheet of metal. This causes the front of the metal to rise. The raised design then becomes a sculptural FORM, instead of a flat SHAPE. When a two-dimensional SHAPE is pushed and raised, it changes into a three-dimensional FORM. SHAPE has two dimensions—height and width. FORM has three dimensions—height, width and thickness.
(It is important for 3rd, 4th and 5th graders to understand the definition of and relationship between three-dimensional FORM and two-dimensional SHAPE.)
SHAPE is flat. It is found in two-dimensional paintings and two-dimensional photographs.
FORM is NOT flat; it has thickness as well as height and width. FORM is found in sculpture. There are Four basic types of classic sculpture—SUNKEN RELIEF: Found on a flat surface background. The LINES of the picture are cut lower than the background. BAS (bah) RELIEF also called LOW RELIEF: Found on a flat surface background as well. The background is cut lower than the sculpture and the edges of the figures are rounded. A coin is an example of Bas/Low Relief sculpture. HIGH RELIEF: This type of sculpture is attached to a background, although the sculpture is raised much higher than the background. Mt. Rushmore is an example of High Relief sculpture. The background of this Presidential sculpture is an actual mountain.
Be sure ALL 6 pictures are returned to the Packet Carrier after your Presentation is finished.
History of Repoussé Sculpture
Around the World
Repoussé is a term used to describe ornamental work produced by modeling (shaping) sheet metal with hammer and punches. It is different from stamped work. The surface of the metal work should be bent back and forth to catch the light at different angles. Repoussé is a type of relief sculpture. Some part of the design might be lower in relief than the rest of the work and fade into the background. Repoussé is usually only one piece of metal.
This process is derived from the French verb repousser, which means “to push against, to thrust back”. When referring to this type of artwork, repoussé has come to be used as a noun to describe a type of sculpture. The word Repoussé describes the part of the work that is done from the reverse side of the metal—pushing up the lines, shapes or patterns from the back. Chasing was a term used to describe the same type of work done from the front of the metal. Chasing, or hammering from the front, is usually done to finish or touch up the last bit of fine detail. In modern times, the term Repoussé has been used to explain ALL relief work done, from the back or the front, on metal.
Repousse techniques date back to the Bronze Age. Repoussé is one of the oldest metal smithing techniques in the world. Virtually every ancient culture, from all over the globe, has left artifact examples of this art form. Items made of bronze were produced in Africa as early as 2,500 BC and work was done in iron as early as 400 BC. Copper, gold and silver were also used. With these metals, and varying techniques, tools, weapons, containers and jewelry of all kinds were made. Repoussé is an ancient art form still in use today.
Hammering the Statue of Liberty
In America, out best and most impressive example of repoussé sculpture is the Statue of Liberty. The copper sheets used to form the Statue of Liberty were much larger in scale than the metal sheets that Sharon Anhorn uses. These large copper sheets were laid inside wooden molds and hammered to shape from the inside. After the sheets were finished, they were turned over and the fine details were hammered from the front (chased) to finish the sheet. Then, the large copper pieces were bolted together over a gigantic iron frame, like a giant jigsaw puzzle, to form the Statue of Liberty that stands in New York harbor today. “Liberty Enlightening the World” (the statue’s proper name) is the largest, full round, copper repoussé sculpture ever created.
Project Idea
Sculpt a Statue of Liberty from a large piece of foil. Sculpt her dress, head and upraised arm first. Don’t worry about details just create the form of the silhouette. Be sure the head is big enough to wear her rayed crown. Cover a small piece of cardboard with foil, for her tablet. Foil can be crushed and shaped like clay. Details like her crown and tablet, or the folds of her robe, need to be glued into place. Everything not created from a single large piece of foil will need to be glued.
Modern Day Repoussé Sculptor— Sharon Anhorn
About the Artist
Sharon Anhorn lives in Colorado. She sells her repoussé and stained glass artwork on-line and was generous enough to donate these pictures of her artwork and the video showing her techniques for this interesting art form to Evergreen Public Schools. Repoussé is a type of relief sculpture. The metal—usually 36 gauge copper, aluminum or brass—is worked, or pushed, easily using any tools you might find around the house, such as ball point pens (these work better if the ink is dried up), sharpened dowels, bolts or nails. There are specific specialized tools that a repoussé artist uses, but this list of simple types of household item tools will create many of the same effects.
When Sharon was in Kindergarten, her teacher said to her mother, “Don’t ever let her stop drawing”. Sharon has been drawing ever since and eventually grew up to become a real artist. She works with stained glass to create some of her artwork. Sharon is always exploring and experimenting with metals, to craft unusual repoussé objects.
Sharon Anhorn’s sculptures are Relief Sculptures. Most of her sculptures are Bas (bah), or Low Relief, but some are High Relief sculptures. (Show a coin as an example of Bas Relief Sculpture.) In Sharon’s metal Relief Sculpture, the picture or design is formed by pushing or beating the metal from the underside (or the back) of the sculpture.
Sharon Anhorn was educated at the University of Colorado and the University of Denver, with graduate work at the University of California at Los Angeles.
Sharon sketches the piece before she assembles the design. For the repoussé work, she uses wooden instruments to press on both sides of the metal. This gives the metal a three dimensional quality. Typically, the copper is heated and where the heating process stops, the color of the metal is determined. When the metal is heated very hot, the copper becomes glowing red and gold. Sharon then uses composite gold leaf for accents on the copper metal.
This artist mostly works alone. When she needs assistants, Sharon uses the students from the Colorado Institute of Art. On some art pieces, Sharon does the design and has someone else fabricate the piece. Sharon then adds the finishing touches of gold and antique glass jewels. Her pieces of stained glass and/or metal art range in price from $1,500 to $6,000
Stained Glass Framed
with Repoussé work
Sharon Anhorn says that she has worked with stained glass for more than 25 years. At the same time she was working on her stained glass projects, Sharon discovered Mexican tin work. This type of craft (tinwork) is hammered metal that is often painted with enamel paints. She thought the two would work well together, but did not have the money to have someone else make the hammered frames for her, so she struggled through the first one by herself. Sharon says the more she worked with metal the more she liked it. She likes how the metal frames and the colored glass work together. Both materials capture light in the same way and enhance each other.
Sharon’s stained glass pictures don’t hang in a window with light streaming through, to illuminate the colors, which is the typical way to display stained glass. Instead, Sharon uses the stained glass like a pigment (paint or color) against a background, to create her pictures. Sometimes she adds aluminum foil behind the glass, to reflect light and give a new dimension to the art. The glass Sharon uses is mostly created in America but some of it comes from Germany. Some of the glass has glittering gold leaf accents. Some of it is antique glass.
The stained glass work inside of this repoussé frame has several motifs (designs) that are similar to Egyptian designs. The circle in the center is a Lotus flower, often seen in Egyptian artwork. The design at the bottom of the circle resembles a scarab beetle with its wings outspread. The Egyptians believed the scarab beetle rolled the sun across the sky everyday. Sharon has placed crumpled foil behind the glass area around the Lotus, to add more dimension. Can you see the foil?
This frame is decorated with an arabesque design (design made of vines and leaves) on the gold rectangle areas that border the frame.
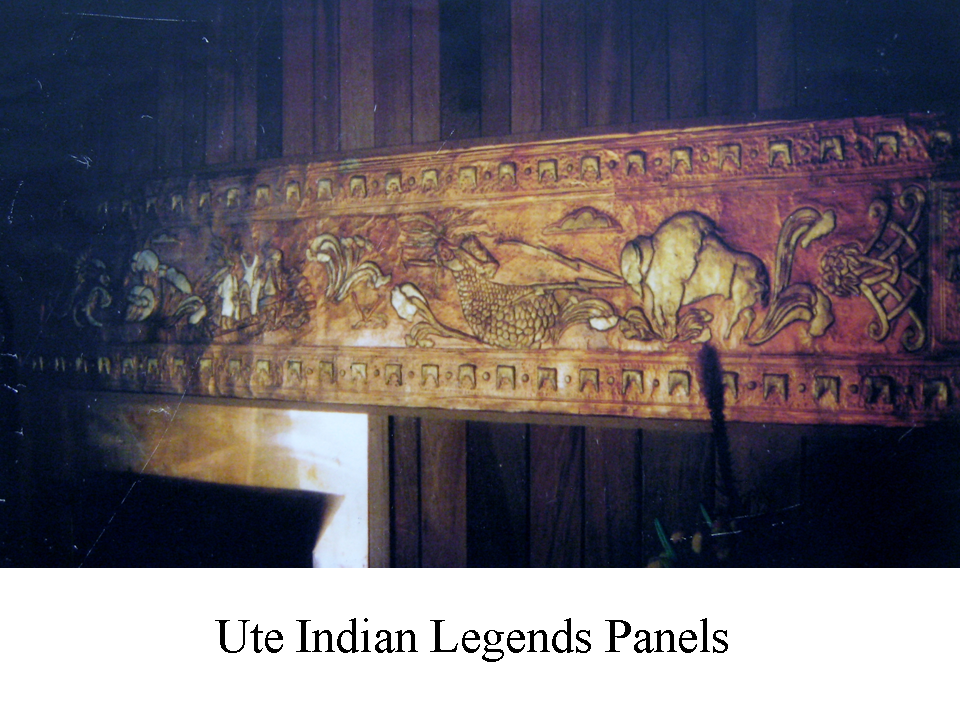
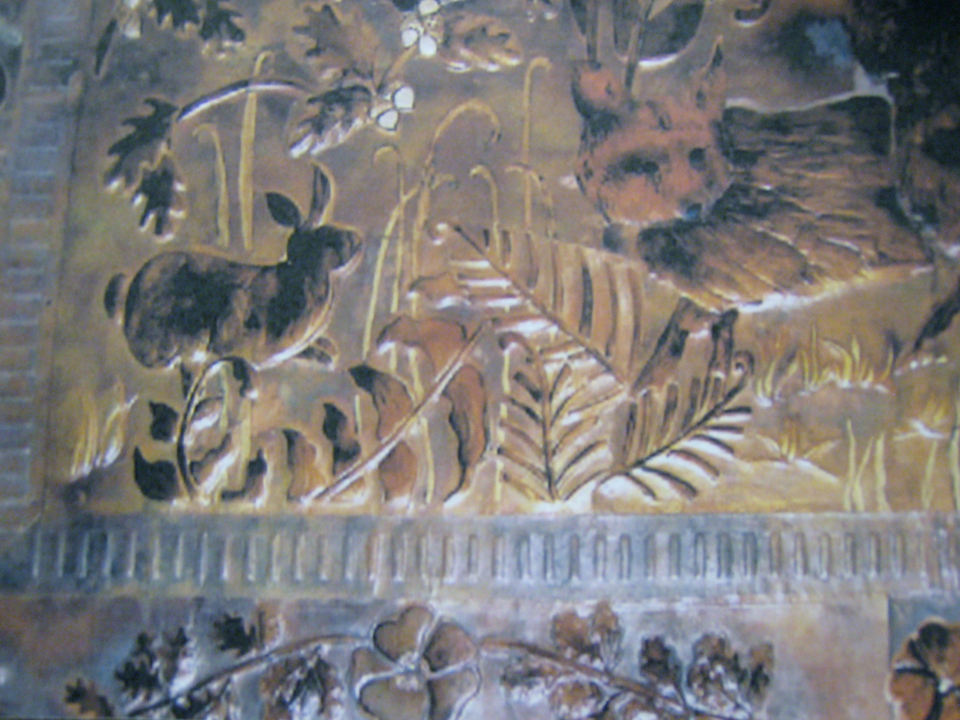
Ute Indian Legend Panels
Sharon created this wall panel for someone whose home is in Northeastern Colorado. The home is built near a mountain where Native Americans have held sacred ceremonies. Sharon researched the Ute Indian legends then crafted copper and gold repoussé panels that illustrated sacred stories of these Indians. The panels are a glowing horizontal band, hung at shoulder height, around the living room.
One of Sharon Anhorn’s early customers was the late singer, John Denver. She also has pieces in collections throughout the United States, Canada and England.
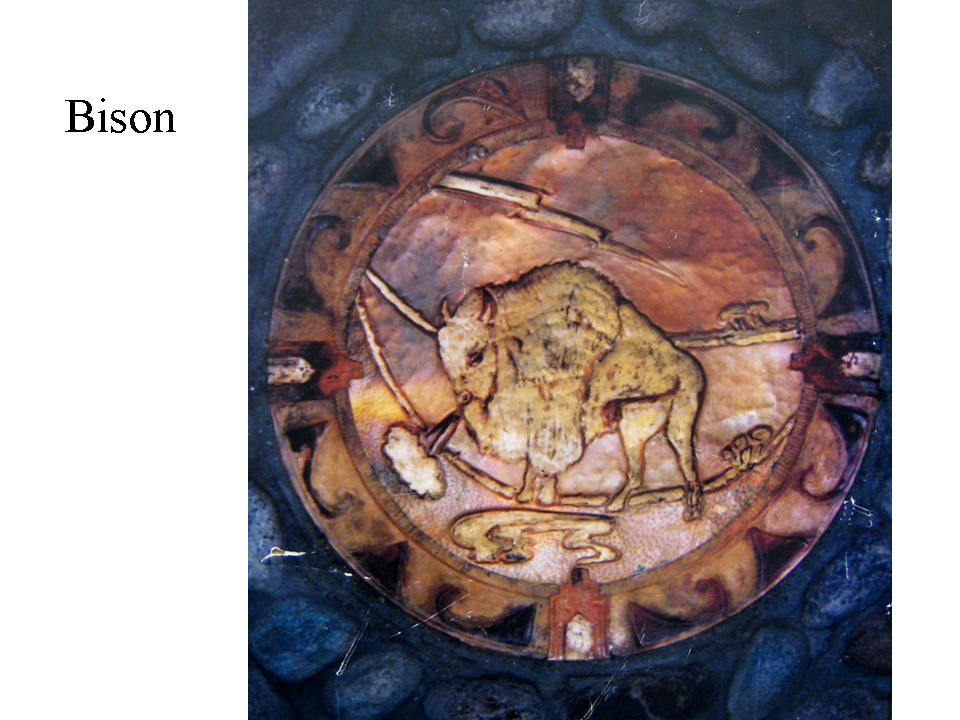
Bison
This copper repoussé circle, with a bison (or buffalo) is permanently set with mortar into a rock wall. If you look closely at the center of the circle, you can see where Sharon has heated the copper to give it color changes.
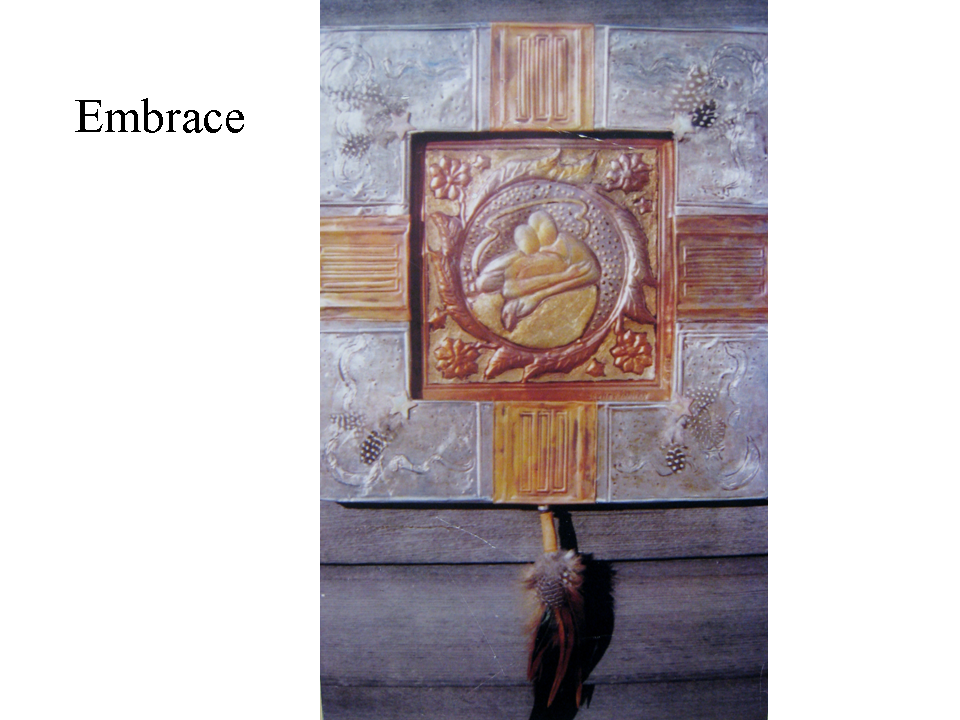
Embrace
What can you see in this RELIEF SCULPTURE? This silver repoussé frame is decorated in the corners with small feathers and a star. The picture in the center of the frame is a mother embracing her child. Sharon has added copper squares, brushed with patina and heated, to each side of the frame. (The video shows how this heating process is actually done.)
Fairytale
The corners of this silver repoussé frame have a sun design pressed into them. The central copper design shows a woman, holding a small baby, leaning against a horse. In the right background, you can see mountains and a crescent moon.
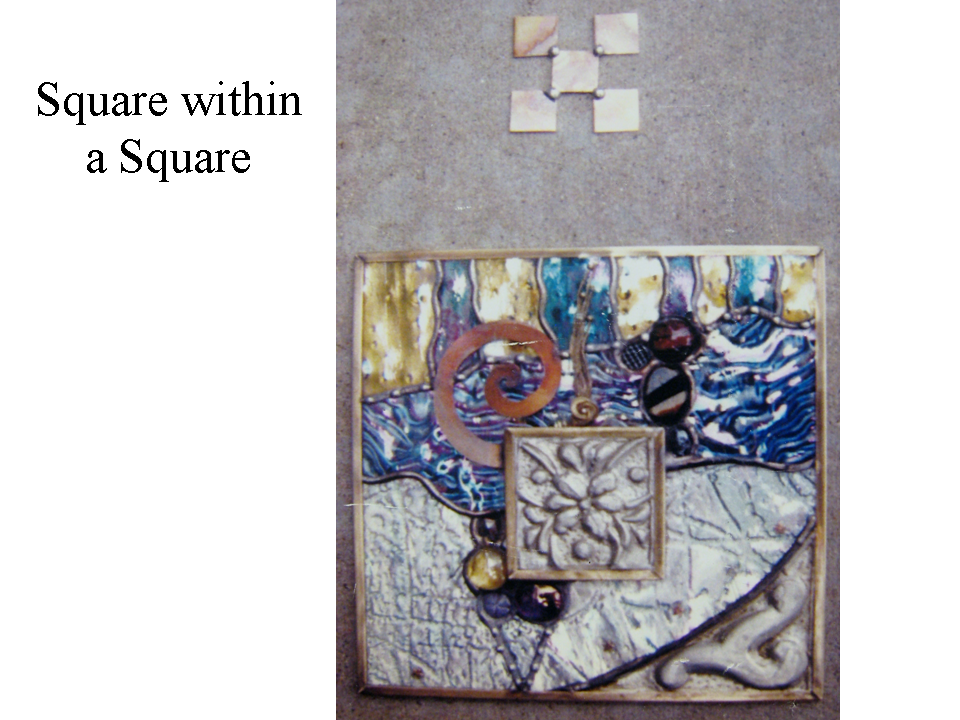
Square within a Square
Contemporary Design
Sharon has painted part of the metal of this design so that it resembles Mexican tinwork she admires. The small central square contains a repoussé floral design.
The artistry of Mexican metalsmiths has been prized for centuries. In ancient Aztec society, metalsmiths were men of importance and position. The Aztecs mined gold and silver and then crafted it into unique, jewel-encrusted objects. The Spaniards conquered Mexico and, at first, admired and valued the intricate artistry depicted in the metal. Eventually, the Spaniards melted down these artistic pieces and sent the valuable gold and silver, from which they were created, back to Spain.
Skilled craftsmen from all over Europe came to Mexico to learn the varied techniques of these skilled Aztec artists. The Indians who taught the Europeans these skills were not even allowed to own any of the precious metals for themselves. Fabulous fortunes were made by the Spaniards as Mexico became the most important silver-producing country in the New World. Of all of the metals worked in Mexico by native craftsmen, tin became the most popular because this was the only metal that the Spaniards allowed the people access to. Tin is thin and flexible and easy to form into various shapes. The tinsmiths would then paint designs onto the embossed metal surface for embellishing frames, mirrors, candle holders and ornaments.
Project Ideas
- (3rd-5th grade) Create a Mexican tinwork ornament, using aluminum foil pans (large oven sheets) cut into animal or bird SHAPES (geometric or free-form will also work well). These shapes can be painted with colored fingernail polish, leaving some areas unpainted but decorated with repoussé style pattern designs. The foil can be pressed (as in repoussé) with craft sticks, ball point pen, toothpicks or sharpened dowels, to form eyes, feathers, mouth, etc. Rolled Aluminum foil is too thin for this project, unless you glue it to a cardboard background first. You will need to tape a paper pattern on the lighter foil and trace it with a ballpoint pen. The thicker foil pan can be pushed directly on the foil. Push the design into the foil FIRST, then paint the fingernail polish in areas of the design that need color.
- Cover a square or rectangle of corrugated cardboard with heavy-duty aluminum foil that is taped or glued to the back of the cardboard. BE SURE THE DULL SIDE OF THE FOIL IS FACING UPWARDS, or it will be very hard to see the finished design. Tape the foil to the back of the cardboard. Create a frame design on a piece of paper that is the same size as the piece of cardboard. After the frame is drawn, tape it to the foil covered cardboard (with masking tape). Trace the pattern with a ballpoint pen to press the design into the foil. The center of the frame can be used for a school photo (glued inside frame) or another traced picture or design. The picture pressed in the foil could be colored with fingernail polish in some areas. This will add a dimensional effect to the foil, like stained glass or antique glass jewels. It would be fairly inexpensive for an entire class to glue colored craft jewels in the corners of the frame.
- Draw simple shapes of birds, trees, stars, hearts, flowers, butterflies or fish on corrugated cardboard and carefully cut out ahead, one for each student. Kids glue aluminum foil (dull side out) to both sides of the cardboard. Use fingernail polish to decorate the shape with strong, vibrant lines and designs. Attach fishing line, thread or yarn to create a hanging, simulated Mexican Tin ware ornament.
- Rigid aluminum sheets can be purchased from hardware stores and used as a substitute for tin. This material can be decorated with acrylic paints to resemble Mexican Tin ware.
- (3rd-5th grade) Create stained glass designs with black construction paper and colored tissue paper. Draw the outline design (the leaded areas between the colored glass) on the paper with white chalk. Use FAT LINES to create an outline for stained glass that has large spaces to add the tissue paper color. After the design is drawn, cut out the areas between the outlines by lightly poking holes in the center of each space and cutting along the inside lines. Cut on either side of the thick lines to leave an outline wide enough to attach the edges of the tissue paper. Lightly brush most of the chalk off the black paper, to glue colored tissue paper in each space.
- Cover a small square of tag board with a piece of heavy-duty aluminum foil and tape or glue this to the back of the tag board. BE SURE THE DULL SIDE OF THE FOIL IS FACING UPWARDS, or it will be very hard to see the finished picture. Tape the outline design of Embrace or Fairytale to the foil using masking tape. Use a ballpoint pen to trace the design into the foil. Do not lift the paper pattern until you have finished tracing the complete design. Carefully pull the pattern off the foil. Mount the foil covered tag board on colored construction paper or poster board to create a frame for the picture. The frame can be left plain or decorated.
- In a plastic ketchup or mustard dispenser, mix black tempera paint with white glue (half and half) and a small amount of water (a few TBSP., depending on how thick the mixture is). Draw a stained glass design on white construction paper or tracing paper. Lightly paint the colored areas of the design first, with watercolor or colored pencils, if you use tracing paper. Wait for the paint to dry and outline with the “leading”, squeezed from the ketchup dispenser. If the design is drawn on construction paper, students can color spaces with thick crayon or tempera paint while they are waiting their turn to use the glue “leading”. Be sure NOT to paint or color on the lines. You need clean lines in order for the glue to stick. Do not paint or color the design if the leading is wet!
- Create “punched tin” ornaments with metal orange juice lids. These lids have finished edges that will not cut small fingers. Kids will need to use a small finish nail and a hammer to punch holes around an outline design shape (something simple like an apple or sun) taped to the metal lid. Punch a hole in the top to hang the ornament. Inexpensive hammers are often found at the dollar stores. You need a minimum of 5 or 6 hammers to rotate with the kids. Talk to the teacher about sending a letter home, a few days before you visit, asking kids to bring a hammer from home for this project. You will need stacks of newspapers, magazines or scrap wood (small sections of a 2” x 4”) for kids to put under their juice lids while they are hammering.
- A more expensive project, but highly recommended if your PTA or PTO has a budget for your Art Discovery program (if they DON’T, go ASK about it!) is to purchase rolls of 36 gauge copper tooling foil for the kids to do REAL Repoussé work on. Use craft sticks, and sharpened dowels or large nails for tools. Cut the tooling foil into small squares with metal sheers (or scissors that you don’t mind dulling a little). It is usually less expensive to order rolls of this tooling foil from an art catalog.
Here’s a Project with an Interesting Lesson:
I wanted to use a method that’s been around for centuries to teach my 4th grade class repetition, rhythm and motion, as well as pattern and design by working with line. The method I used was “repoussé.”
True repoussé uses square or round-edge tools to press on the back of metal to raise a design on the front. Then, to further embellish this metal design, the metal is turned right-side up and its surface is worked with narrow tools. This is called “chasing.”
Before the Sharon Anhorn presentation we discussed rhythm. In art, rhythm means an easy, connected path along which the eye can travel in any arrangement of colors, shapes or lines. In other words: related movement. Rhythm occurs when a common element within a structure is repeated regularly or irregularly.
To illustrate this point, I laid a blank piece of paper on the table. The students looked at it and I asked them, “Does this have movement?” We all agreed there was no movement, it was simply a resting place.
Yet, when pattern is put on that plain paper, the eye begins to travel along the lines and movement is created. We discussed three main ways of achieving rhythmic movement: (1) continuous line movement; (2) repetition of shapes; and (3) progression of sizes.
As we looked at the artwork we focused and compared the pattern and repetition so often found in the frames of Sharon Anhorn’s sculptural pictures. We then examined patterns found in nature. The students named such things as seashells with their repeated lines, lines on leaves and tree trunks, lines on butterflies, and lines on flower petals. (It is best to bring in a few visual examples for this part of the discussion.)
We also looked at a picture of the Parthenon. Its shape is regularly repeated in intervals. It creates movement where the eye moves from one unit to the next—a rhythmic advancing.
The students were given 4″ x 4″ squares of white paper. I asked them to create rhythm within this square using lines with a thin black marker. They were to think of using the lines in a way that would lead the eye and create a type of pleasing balance to the eye. The repeated lines created shapes and forms that also were repeated.
After examining the designs, each student was given a thin, 4″ x 4″ sheet of thin copper tooling metal, which can be purchased through most art-supply catalogs. Each student taped the metal to a thick magazine to have a resilient surface to work on. (Thick stacks of newspapers also work.)
With the line drawing next to the metal, the students reproduced their design by pulling (drawing) a dry ballpoint pen across the metal. We found that a pencil with the lead broken out also worked well to “indent” the lines. It’s best to work in a uniform direction with an even, flowing motion when drawing on the metal.
Once the lines were etched, we turned the metal over and used a craft stick to rub the back of the metal to raise certain areas even more, causing the embossed repoussé look on the opposite side.
When the students were satisfied with the design, they could embellish the design with permanent colored markers. I demonstrated using marker in the depressed line areas to add a different dimension to the design. Repetition of the color created a different type of rhythm.
Finally, we mounted the designs on black construction paper. As a class, we analyzed the finished design and agreed that all of them were successful in using line to lead the eye and create rhythm.
Special THANKS to the volunteer that wrote this idea and added it to the Packet!
Steps used to Create a
Repoussé Metal Sculpture
First, the artist draws lines on the metal. Then, the metal is pushed, from the back,
with special tools. The basic outlines are
pushed first.
After the outlines are finished, the Finally, the finished sculpture is chased, or
outside frame and the details are pushed pushed, from the front, to bring out the
from the back to raise the details. fine detail work.
After the Acid Treatment The polished and finished piece
Copper Tooling
Project: Foil tooling
Goals of Concepts:
The students will create a copper tooling.
Objectives:
Shown visual examples, given tools, teacher demonstration, the students will create a copper tooling based on a design or image that they create.
Vocabulary:
Repoussé, Relief
Supplies/ Tools/ Equipment
Copper Pieces cut to size 4×4 recommended. – 4 x 4 Newsprint or scratch paper – Pencil – ball point pen –
Popsicle stick (or plastic/ wood modeling tools) – Newspaper – Shoe Polish – Paintbrushes
Motivational Strategies
The students were shown and variety of copper tooling examples as well as an example done by the teacher. After pointing out details in the works, students were impressed at the variety of subjects that could be depicted as well as the detail achieved.
Instructional Preparations/ Suggestions/ Safety:
The students should have been shown the proper ways to handle the copper pieces, as the edges were slightly sharp. The edges could have been covered with masking tape to protect their fingers.
Student Activities/ Procedures:
1. The teacher showed the students examples of the various copper tooling examples. The students were then instructed to create a sketch the same size as their copper piece.
2. Once the students were happy with their sketch they were then instructed to tape the top and bottom of the sketch to their copper piece to prevent it moving as they were transferring the image. For this reason it is suggested that they leave a 1 inch margin along the top and bottom of their sketch.
3. They then place a thick pad of newspaper under the foil to begin their transfer on. If they don’t use the newspaper the lines won’t transfer. They should go over every line of their sketch to transfer it to the copper plate. Trace over all lines with a ball point pen – remove drawing.
4. After the sketch is transferred the students should use the Popsicle stick to begin pressing out areas of the copper (rounded modeling tools may also be used). This will give the project a 3-D effect. Turn back to front side and refine edges of design. A dull pencil works well for this if modeling tools are not available.
5. Antique with shoe polish to bring out detail.
Assessment:
Did the students create a copper tooling project?
Did students show low relief by working both sides of the metal?
Submitted by Judy Decker