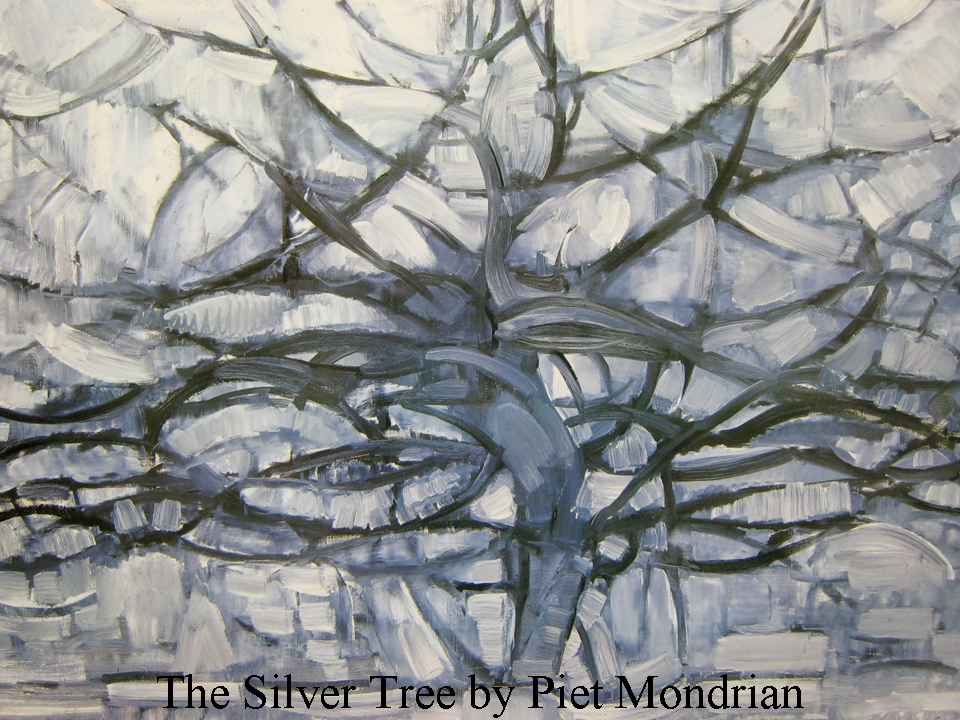
1. L’Arbre Argente (The Silver Tree) by Piet Mondrian
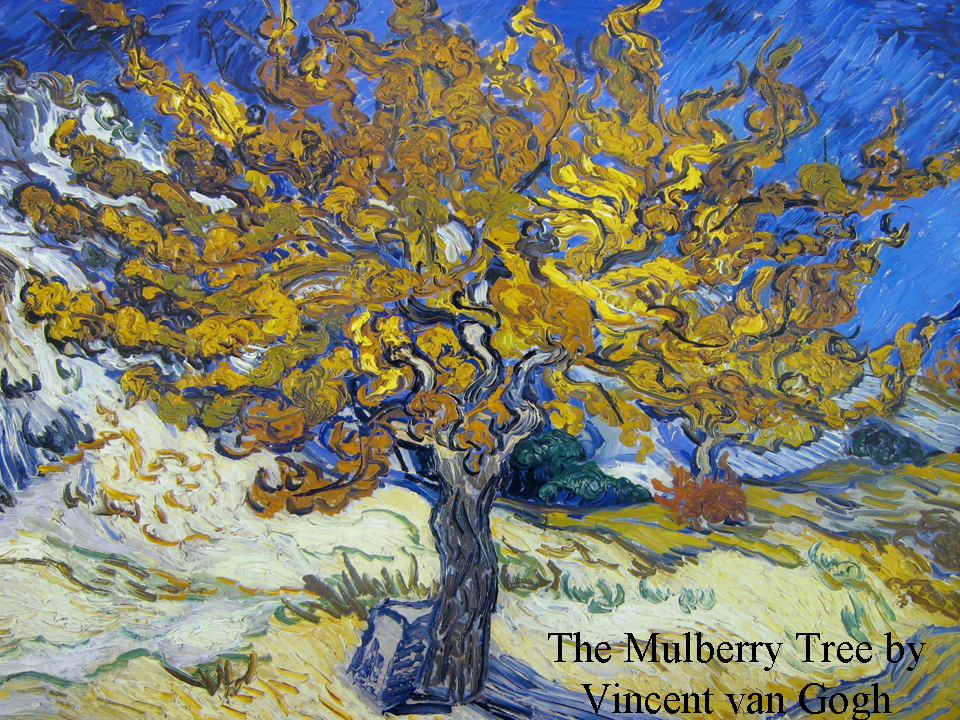
2. The Mulberry Tree by Vincent van Gogh
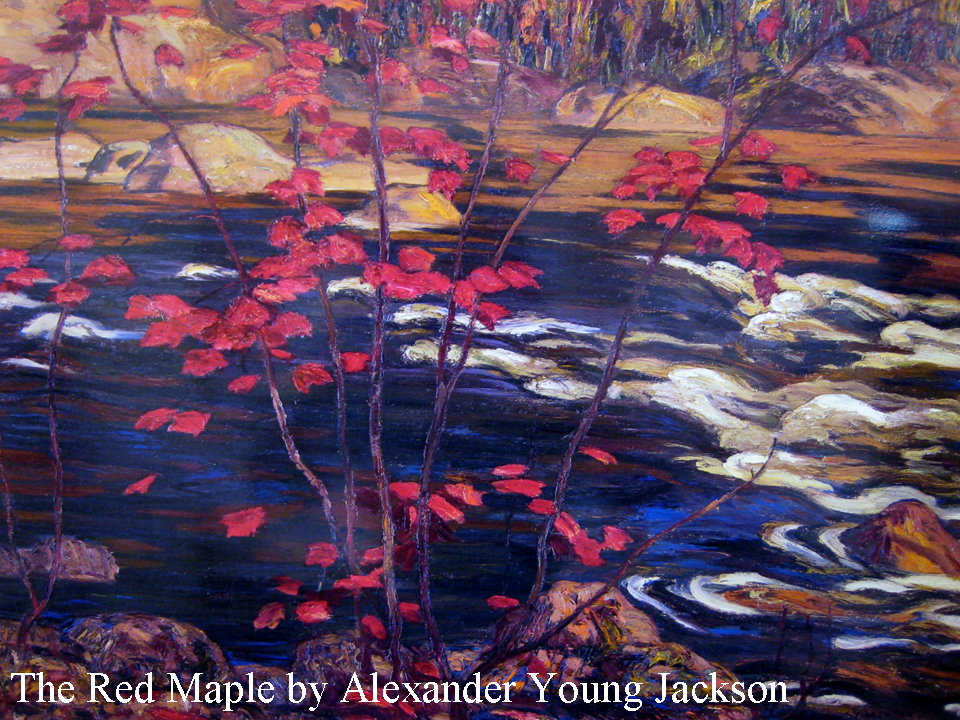
3. The Red Maple by Alexander Young Jackson
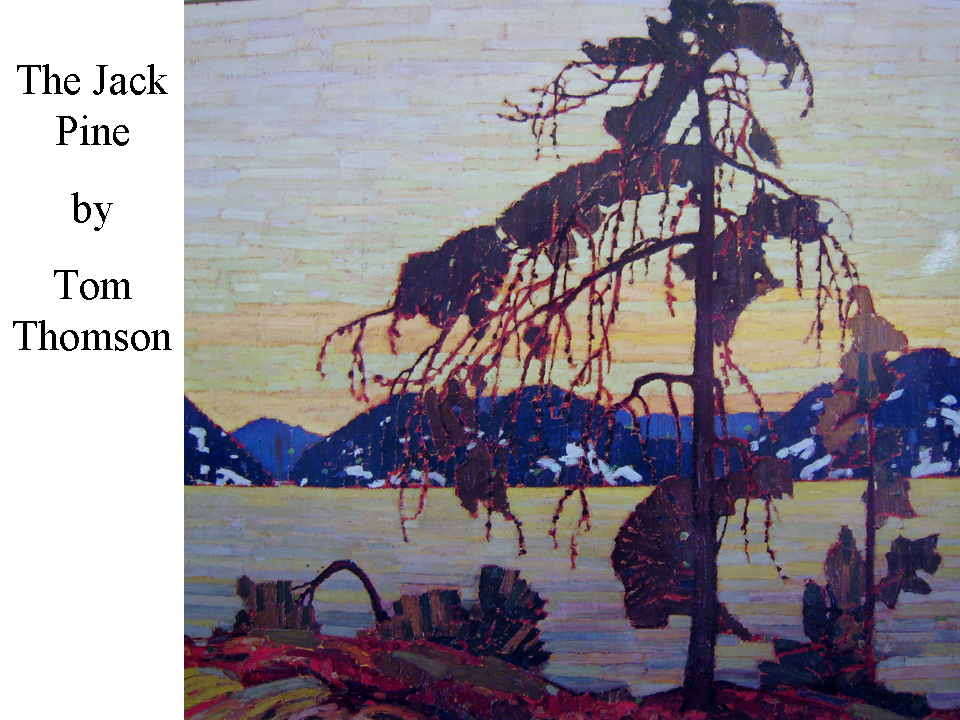
4. The Jack Pine by Tom Thomson
5. A Monstrous Foot by Guercino

Tree paintings emphasize the use of LINE and SHAPE.
How did each artist use LINE differently in these four paintings?
(Discuss LINE with every grade but it is especially important for grades K-1.)
The Silver Tree uses long, sweeping, curing LINES, which completely fill the canvas and almost make the tree disappear. Mondrian has reduced the tree to its most basic element—LINE. The tree almost disappears because this way of painting makes it appear ABSTRACT.
The Mulberry Tree has curved and swirling LINE.
The Red Maple has fewer LINES. The LINES are straighter and mostly diagonal.
The Jack Pine has the most unusual LINE. The LINES of the tree limbs seem almost like points (dots) joined together to create bumpy LINES.
Use some of the extra photographs and drawings of trees (included in the packet) to lead a discussion on the variety of SHAPE found in trees. After a quick lesson on geometric SHAPE for K-1 classes, cut geometric trees, using brown rectangles for tree trunks, and a green triangle and an oval or circle for foliage, and glue the two trees to a blue background. This could be done quickly, as a demonstration and hands-on lesson, and it is good practice for using scissors. Discuss the types of tree each foliage shape reminds us of. You may still have enough time for an additional project after this lesson project and discussion on SHAPE.
Discuss the relationship of the three-dimensional FORM of a live tree, one they can touch on the playground, and the SHAPE of a painting or drawing of a tree, with 3rd-5th graders. A tree created with clay is an ORGANIC FORM (it has three-dimensions) and a drawn or painted tree has ORGANIC SHAPE (it has only two dimensions).
Be sure ALL 5 pictures are returned to the Packet Carrier after your Presentation is finished.
Looking at Trees


Suggested Dialogue
Draw a lollipop tree (circle on top of a vertical rectangle) on the board, at the front of the class.
Can anyone tell me what this is a picture of? Most will recognize that it is a tree.
Does this drawing LOOK like a real tree or a photograph of a tree? No, the drawing does not look like a realistic tree, but a circle and a rectangle joined together are universally recognized as a tree, or an example of REPRESENTATIONAL SHAPE. This shape REPRESENTS a tree.
Look at real trees and/or some photographs of trees.
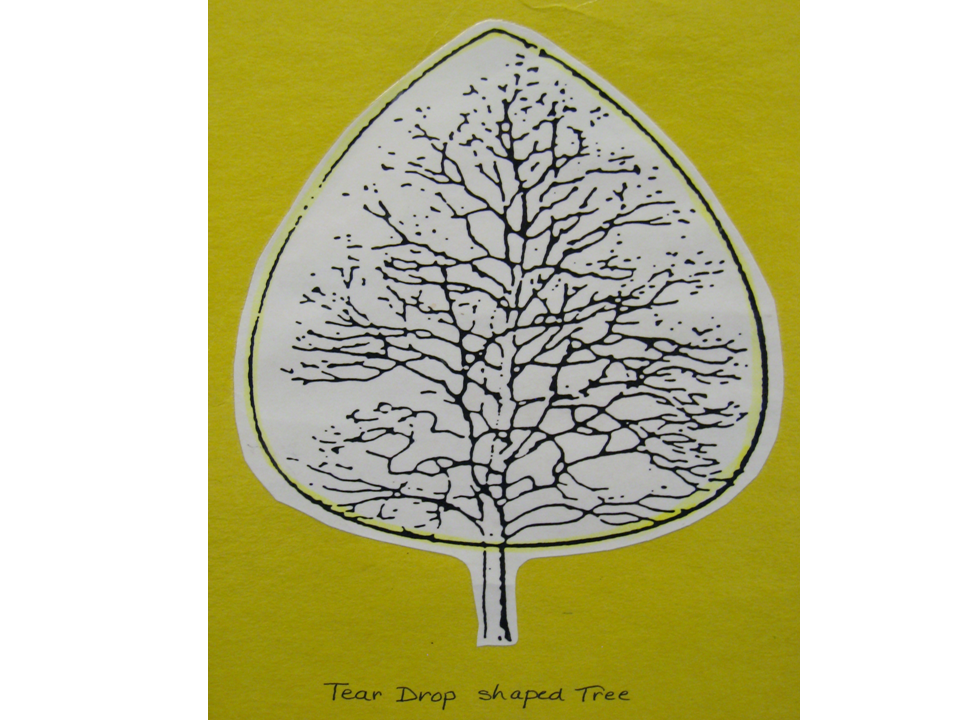
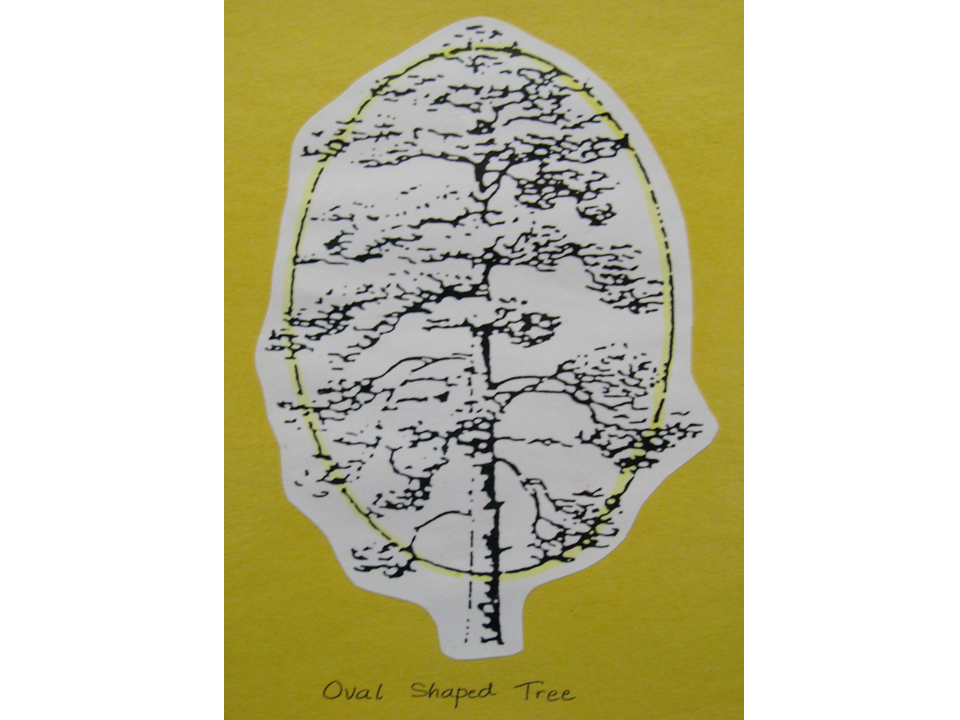
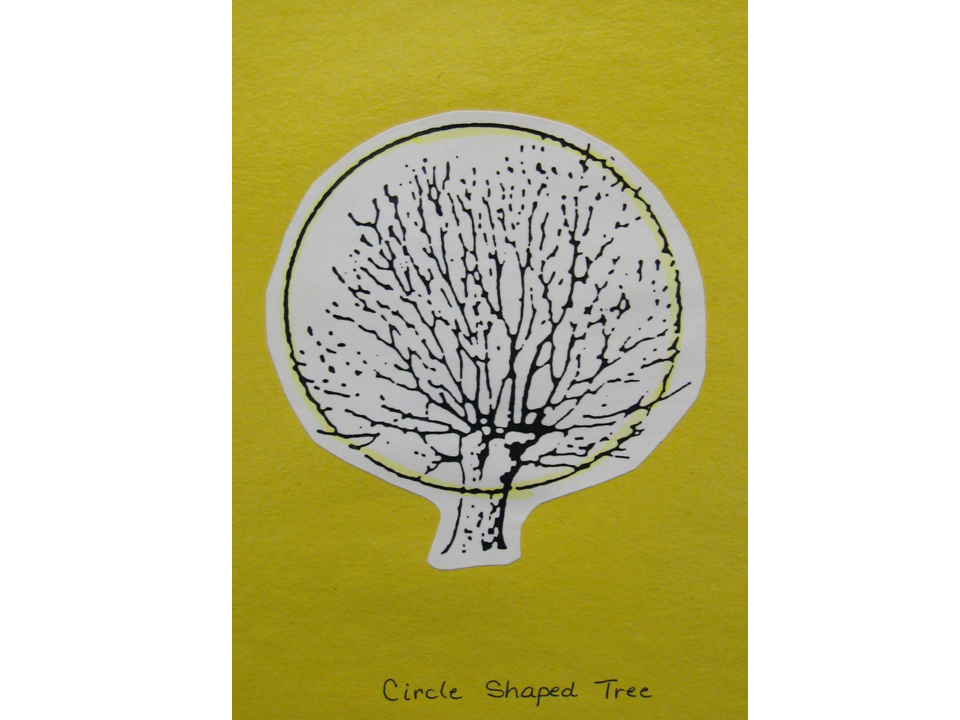
Notice the foliage of the trees. Explain that foliage is another name for the leaves. If you look carefully at the treetops, or foliage, you will notice that trees come in many SHAPES.
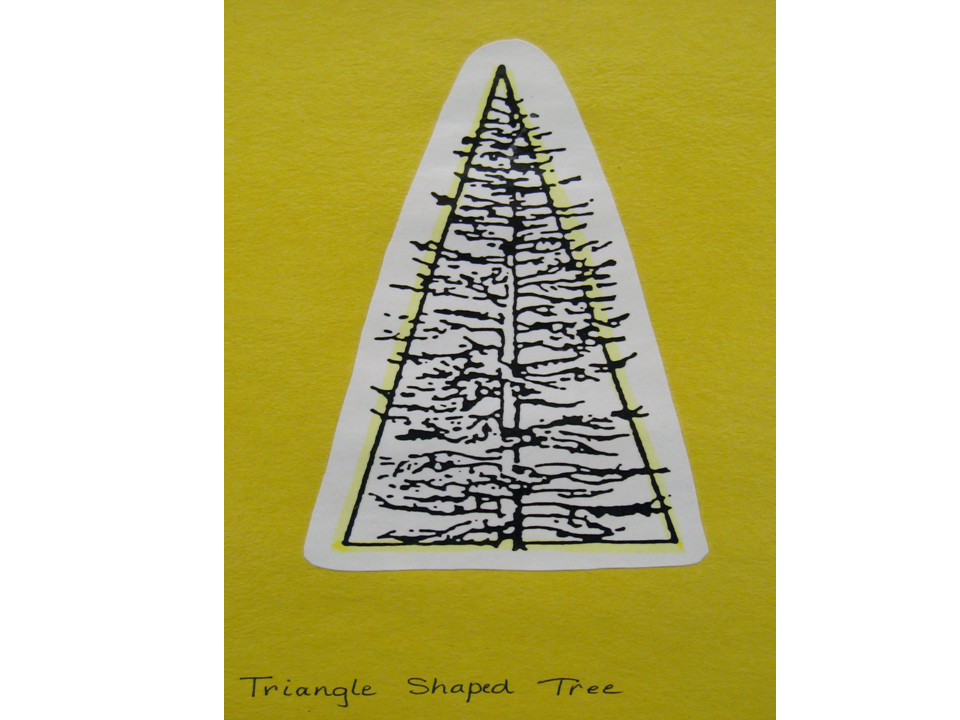
Can you find any trees shaped like a triangle? Oval? Circle? Half circle? Teardrop? Rectangle?
Now, look at the trunks of the trees. What kinds of TEXTURE and COLOR do they have? Is the CONTOUR or OUTLINE of the trunk straight, twisted or lumpy? Is the TEXTURE rough, bumpy or smooth?
Can you find where the trunk has divided into branches?
Do you see how the limbs divide into smaller branches, as they move outward and upward, away from the tree trunk? This is called PROGRESSIVE RHTHYM. In progressive rhythm, bigger or wider parts of an object progressively get smaller or divide into smaller or narrower parts as they move outward.
☺ Bring in a real tree branch, or quickly sketch the branch of a tree on the board, starting from the widest part and drawing outward, towards the small twigs at the tip of the branch. This is a simple visual explanation of PROGRESSIVE RHYTHM.
Discuss how tree branches look in winter, without foliage or with snow on their branches. Sometimes ice storm will thickly cover tree branches with ice, which makes them look sparkly. The branches change in spring, as leaf buds begin to open and add small specks of green to the bare limbs and branches. Some types of trees have pink or white blossoms in spring. Summer trees have leaves completely open and trees that bloom have usually lost their blossoms by summer. Fall trees have a variety of colors—yellow, red, orange, and brown—before the foliage drops to the ground. The colors can be seen on the trees as well as on the ground below, where the leaves have fallen.
Here are some examples of tree (foliage) SHAPE:
|
|
|
|
|
|
|
|
|
|
|
Figure 1
L ’Arbre Argente
(The Silver Tree)
By Piet Mondrian
About the Artist
Piet Mondrian was a pioneer and founder of abstract art. He was born in Ammersfoort, a small town in the Netherlands, as Pieter Cornellis Mondriaan, on March 7, 1872.
Piet’s father was the headmaster of an elementary school, who enjoyed painting as a hobby. His father wanted Piet to become a teacher. Piet’s uncle gave him his first art lessons. After completing his elementary education, Piet declared his intention of becoming an artist, which was upsetting to his family because of the instability of an artist’s income. Piet compromised with his father by gaining his license to teach drawing in public schools. He continued his own art education by attending the National Academy of Art, in Amsterdam, in 1892.
About the Art
In 1912, at the age of 40, Piet moved to Paris and was greatly influenced by the work of Picasso and Leger. Piet discovered Cubism (a style of art created by Picasso) while in Paris. Piet had been a painter of Landscapes and flowers, for the 20 years before he went to Paris, but now his Landscapes began to change. He started reducing the number of details in his paintings and focused more on the main structures and elements in his work. He began to simplify objects to their basics—COLOR, LINE, and SHAPE. At first you could see a recognizable SHAPE of a subject, like this tree, although it is somewhat abstracted because Piet reduced this tree to its most basic LINES. Eventually, his painting changed until it was purely and completely abstract, resembling nothing real, only black LINES creating squares and rectangles, and a small amount of primary COLOR.
Mondriaan changed his named to Mondrian (he dropped an “a”) and set out on a three year series of studies of trees, cathedral fronts, seascapes and scaffolding. He gradually reduced these things to RHYTHMICAL combinations of horizontal and vertical LINES. These paintings were complete abstractions. Many of the canvases he created resembled a series of plus and minus signs, more than the objects he was supposed to be painting. This picture is one of the first paintings where Piet took a natural object (a tree) and used the principles of cubism to show the tree differently.
Suggested Dialogue
Have the class guess what this is a painting of, before telling them that it is a tree. Examine the brush strokes the artist used to create this tree. They are large and have a rough TEXTURE. Mondrian didn’t try to have them blend together smoothly.
Where is the HORIZON LINE in this painting? It is the broken black line, with white lines underneath, painted horizontally across the canvas, about two inches from the bottom.
Can you find the trunk of the tree? The widest vertical (and curved) line in the center
Point out how the branches of the tree move sideways and upwards. Point out the way the branches fill almost the entire painting. At first, this picture seems like a bunch of wildly painted curving LINES. It helps to figure out what this is a picture of to find out the TITLE Mondrian gave this painting.
Point out that Mondrian has reduced this tree to its barest essentials—LINES. He did not try to make the tree look real, like a photograph. At first, it is hard to tell what this is a picture of. Many people can’t even see the tree until they find out the title of the painting. By only using curving LINE, the artist created an ABSTRACT tree—which is just a REPRESENTATION of a real tree.
J (4th and 5th grade) Draw a tree on the board, with a circle for the top and a vertical rectangle for the trunk. Point out that younger kids will usually draw a tree using a circle and a rectangle SHAPE because it is easy. People recognize that these two SHAPES used together REPRESENT a tree, although you won’t see any real trees that actually look like this. A tree created this way is an ABSTRACT tree, not a realistic tree.
What can you say about an artist’s STYLE if his/her tree painting resembles a photograph? The painting is an example of REALISM.
What can you say about the STYLE of The Silver Tree? The artist was more interested in creating a MOOD. The painting is an example of EXPRESSIONISM. The painting is ABSTRACT because the artist only used the Basic Element of LINE to create a representation of a tree.
Project Ideas
- Create a tree “Mondrian Style”. Solidly cover the entire background first, using black or blue tempera paint. While this paint is still wet, paint bold brushstrokes of white over the entire background. This will blend the color into the white and also leave some bold patches of white. After the background is dry, paint an abstract tree with the first color, using curving LINES that FILL THE ENTIRE BACKGROUND. Be sure to add the HORIZON LINE where the tree trunk begins. After the tree is dry, use white to touch up and highlight, the way Piet did with Silver Tree.
- Have class draw an ABSTRACT, SYMMETRICALLY BALANCED tree as you construct it, at the front of the room, using Tinker Toys. Construct tree using 17 yellow sticks (the short ones) and 16 wooden rounds with a green plastic base. (Practice this at home first, so you understand how the tree is supposed to look and how it fits together—REMEMBER this is an abstract tree!) Start with base, one stick and one round.
Kids place black construction paper horizontally on desk and use two pieces of different colored chalk. Ask that they choose one color for the sticks and one for the round connecting forms. Explain that they must not alternate these colors once they begin drawing (the base can be drawn with either color). Begin by drawing base in CENTER FOREGROUND (bottom). (Show K-2 classes exactly where to begin on their paper because younger kids have a tendency to start higher, in the very center of the paper.) Allow younger kids time to draw this before moving on. Remind class to keep their LINES short and their rounds small, or they might not fit the whole project on their paper. Next, add 4 sticks, evenly spaced, to the sides of the top round and 1 to the top center. Now, add rounds to these 5 sticks. Stop at this point with K-1 students.
Explain that the tree remains SYMMETRICALLY BALANCED only by adding equally to both sides as it is constructed. Add 1 vertical stick to each of the last 5 rounds. Add the last round to the center stick. Once they have reproduced the LINES of the Tinker Toy tree you created, explain that they can add as many more LINES and circle SHAPES as they wish, to make their tree fuller, but they must KEEP THEIR TREE SYMMETRICALLY BALANCED! (The same on both sides.)
*SPECIAL NOTE: grades K-2 did better when they drew the tree, one step at a time, as it was being constructed.
The Mulberry Tree
By Vincent van Gogh
About the Artist
*For more detailed information on this artist see Packet 14. Vincent van Gogh.
Vincent painted this picture in October 1889, while he was in a mental hospital at Saint-Remy.
About the Art
The subject of this painting is simply a tree, which is centered in the picture. It was fall when Vincent painted this picture, so the golden foliage was getting ready to drop off the tree. Vincent painted the tree’s leaves with swirling brushstrokes, which make them look as if they are a dancing fire! The tree limbs dance and swirl between the golden leaves. Notice how curled the branches are. (Point out the dark curly LINES throughout the top of the tree—these are the branches.)
Vincent loved to use thick paint, which he didn’t smooth or blend. If you look closely, you can see the individual brush strokes all over the painting.
Today, the works of Vincent van Gogh are considered among the most important of the late nineteenth century. Though his painting career was brief, Vincent’s art had considerable influence on twentieth century painting. In Vincent’s lifetime, he only sold ONE painting. Today, his paintings are some of the most sought after and command the highest prices on the Fine Art market!
Suggested Dialogue
Can you find the shadow of the tree? Vincent painted blue diagonal lines, moving away from the tree trunk. We can only see part of the shadow because the rest of it is somewhere outside the painting.
Point out the brushstrokes of the bright, ultramarine sky, in the top right hand corner of the BACKGROUND. This effect seems to make the sky burst away from the tree.
Can you make out any details in the rest of this painting? The tree is growing from the bottom of a downward slope of hill. In the right FOREGROUND of the picture, it looks like a road. Notice how the tree shadow stops here. It looks like a sharp angled rock at the base of the tree, an orange tree or bush peeks over the edge of the painting in the right MIDDLE GROUND. How has the artist created the illusion of movement? The earth looks as if it were moved by some underground force to ripple in all directions. The same swirling movement is repeated in the flamboyant foliage, whose swirls are outlined against the intense blue sky.
Point out the way the hillside seems to get steeper on the left of the tree. The artist made this area look like a hill by putting lighter color paint behind the tree, to the left and all the way to the edge of the painting.
Project Ideas
- Use heavy brown crayon to draw a twisted tree trunk with curling, twisted branches. Thickly paint fall foliage with yellow and red paint with swirls and twists around the branches. Leave as many branch lines showing as possible. Try to paint along the branch lines. Mix the yellow and red paint to create shades of gold and orange. Thicken tempera paint with laundry soap or wheat paste, to resemble Vincent’s thick oil paint.
- Create trees with various patterned wrapping paper, wallpaper, scrapbook paper or fabric. Glue the tree(s) to a solid color background. You really need to stretch your imagination to figure out how to use ALL of these SHAPES to create just one tree. These trees can be very interesting with many bright, colorful and varied designs. Try to create an interesting PATTERN in the treetops. The PATTERN, COLOR, SHAPE and DESIGN used in the trees are EXPRESSIONISTIC. An entire forest of these trees, glued to a solid color background, is another creative project.
The Red Maple
By Alexander Young Jackson
(1914)
About the Artist
Alexander Jackson was born in Montreal, Canada, in October 1882, in an old, run-down house. He had to go to work at the age of 12 to help support his impoverished family. Because of this, Alexander only managed to finish elementary school.
Jackson worked for a lithography company until the age of 22. Here he made sketches of motors, ladies’ corsets, stoves, and labels for bottles and beer barrels. These sketches were used to create printed lithographs (printed ink line drawings).
Alexander took painting lessons in his spare time. After ten years of hard work, Jackson had saved enough money to go to Europe to study painting. He was influenced by the Impressionist painter’s rejection of the rules of traditional art. Although his work is different from the Impressionist Style, it does have a lack of realistic detail, similar to the Impressionist artists. Jackson’s work doesn’t look like a realistic photograph. The painting is more Expressionistic.
Before returning to Montreal, Jackson studied for two years at the Academie Julien, in Paris. His first exhibition, on his return to Canada, was a complete failure. In 1911, the Canadian painter, Lawren Harris, purchased one of Jackson’s paintings and invited him to come to Toronto to meet other Canadian Landscape painters. At that time in Canada, Landscape painting that promoted areas of Canada was very popular.
From 1920 on, Jackson and six other Canadian Landscape painters exhibited together under the name of The Group of Seven. Critics reacted severely to the group’s first exhibition and some even accused the Group of Seven of discouraging immigration to Canada by presenting an ugly view of the Canadian Landscape through their painting style. Why might people feel so negative about a painter’s style?
Jackson continued to paint until the age of 91, depicting the infinite variety of the Canadian landscape in his own way.
About the Art
The tree in this painting is a young sapling. It isn’t old enough to have a main trunk and it doesn’t have many branches. The tree is growing near the rocky edge of a stream or river. The leaves are spaced far apart and there are not many of them. The leaves have no detail; they are mostly small dabs of red paint. Although the leaves aren’t realistic, we can still recognize a tree here.
Suggested Dialogue
Can you see the red maple? Is it hard to figure out what the artist has painted?
What do you see in the MIDDLE GROUND of this Landscape painting? A rocky river or stream
How does the artist show the water is rocky? The artist painted in areas of white, which look like where the water bubbles around the rocks in the water. We can also see larger rocks near both banks, in the calmer areas of water.
Is this Landscape REALISTIC or EXPRESSIONISTIC? EXPRESSIONISTIC, not as clear as a photo
Project Idea
- Paint the limbs of a sapling on construction paper. Use small pieces of torn paper to create leaves. The painted leaves of this sapling are small patches of color that roughly resemble a leaf. The torn paper should closely resemble these.
- The Canadian flag is white with a red maple leaf in the center. Create a construction paper Canadian flag, in honor of this Canadian painter. Trace around a real maple leaf for the center or copy the shape from a book.
The Jack Pine
By Tom Thomson
About the Artist
Tom Thomson was born in Canada, in 1877. Thomson grew up in Owen Sound, in Ottawa Canada. In 1911, Thomson went to the Lake Scugog and Hunter River areas of Canada to paint Landscapes from nature. This was a time when the Canadian government and many Canadian businesses encouraged artists to create scenes from the beautiful Landscapes of Canada. Canadians wanted to encourage people to immigrate to their country. Much of Canada was uninhabited and Thomson had to take long canoe trips and hikes, alone through the wilderness, to paint Canada’s scenic areas. Although Tom was a sociable person, he also enjoyed being alone and this characteristic allowed him to fully explore and paint the Canadian wilderness.
After 1914, Thomson was able to devote himself full time to painting, thanks to the financial backing of a rich Toronto doctor. Since Thomson had never received any formal artistic training, the only outside influence on his work was the decorative art he had seen in illustrated magazines.
Thomson knew Alexander Jackson, the Canadian artist who painted The Red Maple. Jackson taught Tom Thomson how to mix his colors. Thomson also knew several of the other Group of Seven Canadian Landscape artists (MacDonald, Jackson, Varley and Harris). These artists often joined Tom on many of his sketching expeditions to Canada’s Algonquin Park. He picked up many tips watching these Group of Seven artists at work. Tom Thomson is considered a folk artist or naïve artist because he didn’t go to art school to learn about painting. He taught himself. Many famous artists throughout history learned to paint on their own, just like Tom Thomson.
Thomson painted Landscapes almost exclusively. He spent many months in the Canadian wilderness sketching. His career ended suddenly and prematurely in 1917, when he drowned during a canoe trip. Despite his short career, Thomson left behind many, many Landscape paintings that had a great impact on Canadian art for years after he was gone.
About the Art
In this painting, Thomson used wide horizontal brushstrokes of pink, mauve, yellow and green to depict the calm water and sky, behind the tree. Notice how straight and orderly his painting lines are. The blue mountains and the vertical tree present a clear contrast to the brilliant BACKGROUND. Thomson uses very bright and intense colors in the FOREGROUND.
Can you find a triangle in this painting? The top of the tree and the widest branches create a triangle
Project Ideas
- Create a landscape painting with rocks and plants in the FOREGROUND, water in the MIDDLE GROUND and mountains with a sunset sky in the BACKGROUND. Using dark brown or black paper cut a silhouette of a tree (any type). The tree silhouette should be large enough to go from the bottom to the top of the landscape you have painted. Glue the tree SHAPE to one side of the landscape painting background. The dark tree will pull forward in your painting and become the CENTER OF INTEREST, or focal point (the first place a viewer’s eyes go). Cut out several different trees so you can have a choice when you decide which one works best to glue on your background painting.
- Create a tree SHAPE using dry spaghetti glued to construction paper or poster board. Use several pieces, close together, to create a thick trunk. Use progressively shorter pieces for the branches, to create PROGRESSIVE RHYTHM.
- If you have a well-shaped tree or sapling on your school property, and the weather is nice, check with the teacher about taking the class outside to sketch it.
- Younger classes, in the spring, can draw a tree, with branches only, using brown crayon. Glue pink or white popcorn to the branches for blossoming cherry, plum, peach or apple trees.
A Monstrous Foot
By Guercino (1591-1666)
About the Artist
Guercino (meaning “squint-eyed”) was the nickname of Giovanni Francesco Barbieri. His drawings include studies for his religious paintings and many Landscapes. Guercino’s pen and wash drawings were very popular in 18th century England. The British Royal Art collection, at Windsor Castle, contains about 600 of his drawings.
The Italian painter Giovanni Francesco Barbieri, was born at Cento, a village not far from Bologna. His artistic talent developed very rapidly, and at the age of seventeen he was already quite an accomplished painter. The fame of the young painter spread beyond his native village, and in 1615 he moved to Bologna, where his paintings were much admired.
Guercino was esteemed very highly in his lifetime, not only by the nobles and princes of Italy, but by his brother artists, who placed him in the first rank of painters. He painted remarkably fast and completed about 106 large altar-pieces for churches and about 144 additional paintings in his lifetime. His most famous piece is thought to be the St. Petronilla Altarpiece, which was painted at Rome for Gregory XV. Guercino continued to paint and teach up to the time of his death, in 1666, and amassed a handsome fortune from his painting.
About the Art
A pen and wash drawing is created entirely with ink. To create LIGHTER VALUES (grays) the artist would dilute the ink. Often this was applied to the picture with a brush. The DARKEST VALUE (black) was undiluted ink, usually applied with a pen.
Suggested Dialogue
Which two parts of a human body did this artist use to create his tree picture? A hand and a foot
Notice how Guercino used the wrinkles and veins of human skin to create the TEXTURE of his tree. What type of TEXTURE do you see? The bark has a very rough, bumpy texture. This tree is an old tree. We can tell by its thick trunk.
Can you find the TOES of the foot? Which part of the tree do they form? The roots that can be seen above the ground
Can you find the knuckles on the fingers of the hand? On the main branches, these resemble burls or bumps found on an older tree.
On your first glimpse of this picture, did you think it was a “normal” drawing of an old and gnarled tree?
Project Ideas
- (Grade 5) Lightly draw a tree with a pencil. Next, use two plastic cups to create a small amount of medium and light value ink, by adding water to India ink. Use a third plastic cup with a small amount of pure ink, to great the darkest value ink. Use a paintbrush to create an ink wash over your pencil drawing, to make your picture look similar to Guercino’s picture.
- Younger grades can trace their handprint, with fingers spread, and part of their wrist, on a piece of brown paper. Cut this out and glue to a background. The wrist will be the trunk of a tree and the fingers will be the branches. Tear leaves from colored paper and glue to the branches—green and pink/white for a blooming spring tree, warm colors for a fall tree, and two shades of green for a summer tree. Winter trees could be covered with “snow” by gluing salt on the ground and the branches, in the same way you would glue glitter.
Portrait of Guercino
Cinquains
Take a walk outside for a few minutes and observe as many trees as you can. Try to look at several different types of trees. Look closely at the trees, smell them, listen to them, touch them and see if you can find out the names of the types of trees you see. Next, make a list of all the characteristics of the trees. Use Adjectives to describe them. Describe their texture. Describe their color and the different shades of color that you find. Think of original color names that describe the different shades of color, like sparkly-green or bird nest-brown. What kinds of lines do you see? What kinds of leaves and trunks do they have?
Trees
Look__________________________________________________________________________
Trees
feel___________________________________________________________________________
Trees
smell__________________________________________________________________________
Trees
sound like__________________________________________________________________
List as many words as you can to describe the trees. These are your observation words because they describe what you observed. Now, take this helpful list of words back to your class and follow the directions below.
Definitions
Noun: person, place or thing
Adjective: A word that describes a noun— Example: silly, red, or ugly
Verb: A word that shows action
Synonym: word having almost the same meaning as another word. “Big” and “Large” are synonyms as are “Awful” and “Gross” — “Slimy” and “Yucky” – “Delicious” and “Tasty”
Now, using your observation words as a guide (listed above), write a poem about the trees you saw, on a separate piece of paper. Follow the instructions in the example below, but do not copy any of the words:
|
Tree |
|
Barren, deserted |
|
Withstanding, braving, fighting |
|
Nature’s soldier of winter |
|
Maple |
Write a poem about a tree here.
Winter Tree with Snow
What kinds of lines do you see in the branches of this tree?
Winter Tree with Snow
What kinds of lines do you see in the branches of this tree?
Fall Trees
This view has an interesting PERSPECTIVE.
Fall Trees
What type of COLOR do fall trees have,
WARM or COOL?
Spring Tree with Blossoms
What type of SHAPE does this tree have?
What type of COLOR?
Spring Tree with Blossoms