PDF Info: Packet 1. The Art of Photography
1.
2.

3.
4.

5.

6.
7.
8.
Packet Extra:

Black and white photographic images are more dramatic than colored photographs. The lack of COLOR emphasizes VALUE, LINE, SHAPE, TEXTURE, RHYTHM and PATTERN. Point out CONTRASTS in dark and light VALUES (ALL Grades). Discuss the variety of medium VALUES (grays) found in black and white photography. The worksheets titled Black and White, Color—Tints and Values, and Color—Shades and Values would be great projects to reinforce VALUE with this packet (especially Grades 3 and 4). Tempera paint works best!
Highlights for discussing additional BASIC ELEMENTS & PRINCIPLES OF ART:
(K-3)The rails the man leans against (Foreground) form thick, straight, diagonal LINES in White Angel Bread Line. The vertical streaks of clouds across the sky and the HORIZON LINE should be pointed out in Equivalent…. The trunk of the snow covered apple tree is vertical; the horizontal LINES of the branches create progressive RHYTHM. The tracks of skiers in the snow create curved LINE, PATTERN and RHYTHM. The rocks in the Foreground and Middle Ground of Examples create PATTERN, as well as TEXTURE. Georgia O’Keeffe’s hands exemplify organic SHAPE, also the rocks.
Define Portrait (picture of a person or animal) and Landscape (an outdoor scene). Have class help you divide the PORTRAITS on one side, at the front of the class, and LANDSCAPES on the other.
Define or show an example of SYMMETRICAL BALANCE or FORMAL BALANCE, (Picture or scene can be divided down the center into exactly, or mostly, equal parts—like a human face.) A Portrait, when the subject is facing the camera, is often Symmetrical, if the subject (person or pet) is centered in the picture.
ASSYMETRICAL BALANCE, or INFORMAL BALANCE, happens when the elements are not perfectly matched, but the parts of the picture catch and hold your eye equally. In this type of BALANCE, there is no way to divide a picture into exact equal parts, down the center. A large SHAPE on one side may be balanced with several smaller SHAPES on the other side. Each side of the picture is somewhat different. Georgia O’Keeffe is facing the camera (you can divide her face in half) but her hands create Asymmetrical BALANCE. The Migrant Mother is facing the camera but her head is slightly turned to the left. Most of her face, arm, hand and the child leaning on her shoulder (left) are BALANCED by the baby and the taller child (right). This makes both sides of this photograph equal, yet different.
Point out that the BALANCE of every photograph in this packet is Asymmetrical, which is usually more interesting. Discuss different ways kids might arrange their own Portrait or Landscape photographs, to make them the most interesting (Asymmetrical).
Be sure ALL 8 Pictures are returned to the Packet Carrier after your presentation is finished.
A Few Highlights in the History of Photography
Today it is almost impossible to imagine what the world would be like without photographs and the photographic process. So much of our lives revolve around the fact that light can be used to create images. We take televisions, motion pictures, magazines and newspaper illustrations for granted. But photographs are only a very recent invention.
Camera comes from the Greek words meaning “light” and “writing”. The idea of photography or “light writing” was probably inspired by Aristotle, an ancient Greek Philosopher and scientist (born 384 BC, died 322 BC-or BCE), who recorded observing images formed on the ground, after passing through tiny gaps in tree foliage, during a solar eclipse.
The first camera was actually a huge box. This box was large enough for a person to sit in and was called the Camera Obscura (dark chamber). Some people believe an unknown inventor in Greece, about AD 1500, invented the Camera Obscura. Others credit Leonardo da Vinci with its invention. This “camera” was not a camera like the ones people use today. The Camera Obscura did not produce a permanent image or photograph. It had a tiny opening on one side, where light entered and projected an upside down image on the inside back of the box, of an image from outside the box. Artists used this box as a sketching aid. The artist would trace the picture and paint it. The image appeared more like a blurry, upside down slide reflected on a wall.
In 1614, Angelo Sala mentioned that silver nitrate turned black when exposed to the sun. This discovery was not attributed to the action of light so it wasn’t recognized as any significant breakthrough. In 1727, a German physicist, Johann Schulze, discovered that silver salts were sensitive to light and he was able to produce an image. Unfortunately, the images that Schulze created were not permanent, so they soon faded.
It wasn’t until 1826 that a Frenchman, named Joseph Niepce (nipe-see), discovered a way to make a permanent image using the Camera Obscura. Niepce used a much smaller box and a chemically coated glass plate to produce the world’s first photograph. He set his box, with the plate inside, on his window ledge one morning and left it there, undisturbed, for eight hours. The picture it produced was of the buildings across the street. There were no people in this picture because it took so long to expose the plate that the people who were walking back and forth on the street didn’t show up because they were not standing still for the entire eight hours! Niepce called his photograph heliography, which meant “sun-writing”.
In the 1830’s, Niepce teamed up with a painter named Lois Daguerre (da-gware) who was also trying to preserve these images of light. In 1839, the Daguerreotype (da-gware-o-type) was announced at the French academy of Science and it soon spread like wildfire throughout Europe.
The Daguerreotype became very popular for portraiture, although the subject was required to sit perfectly still for 6 to 10 minutes for the photograph to expose. In these early photo studios, there were mirrors on the wall in front of the sitter, so he could study his expression to keep from moving. The studios also had a head clamp, used behind the sitter’s head, to help the person stay perfectly still during the 10 minutes required to take the picture. Each Daguerreotype was unique because there was no negative to produce any other copies of the picture. Most Daguerreotypes were portraits and these portraits included pets, post-mortems (dead people) and occupational portraits. The process was also used for landscapes, architectural studies and art reproductions.
Finally, in 1884 an American, named George Eastman, patented the first flexible roll film and four years later, the first roll film cameras called the “Kodak”. These were the first cameras that anyone, who wasn’t a professional photographer, could use.
Alfred Stieglitz
On New Years day, January 1, 1864, Alfred Stieglitz entered the world in Hoboken, New Jersey. He was the oldest in a family of six children. Alfred’s father was very financially successful so Alfred had many opportunities that other children did not have. He attended private schools and his family lived in a luxurious Manhattan brownstone mansion. Childhood summer visits to New York State’s resort area of Lake George became a lifelong event for Stieglitz.
When Alfred was 17, the Stieglitz family moved to Europe to further their children’s education. Alfred enrolled at Berlin Polytechnic, at the age of 19, to study mechanical engineering. A few months later, the purchase of a small camera led him to abandon engineering for photo-chemistry and to begin his photographic career.
While Alfred was a student in Berlin, many of his friends were painters. During this time, he decided to fight for the recognition of photography as a creative art medium equal to that of painting. Alfred believed that the best way to gain this acceptance for photography, in the art world, was to become a photographic authority. He thought that if he set the highest standards for his own photographic prints and won all the possible prizes and medals that were offered in photography, the world would accept him as an authority. The result of this would be that the world would also accept photography as an art.
In Stieglitz early photographic career, he experimented with technical photographic innovations, which at the time were believed impossible to achieve. He discovered many new and exciting things to do with photography. Before the 1900’s, for example, Alfred Stieglitz had made the first successful photographs ever taken in snow (1893), in rain (1894), and at night (1895). By 1910, these photographs had won many important prizes. Before Stieglitz, serious photographers only used large and bulky box cameras. Alfred was the first professional photographer, before the 1900’s, to seriously use a small, hand-held camera for his wonderful photographs.
Stieglitz eventually realized that his own personal fame would not make the art world recognize photography as an art. He believed that the work of a group of photographers, working together, was probably the only way to have photography accepted in the traditional art world. In 1902, Alfred gathered a group of talented American photographers together, who were also dedicated to his idea. The group was called The Photo-Secession.
In 1905, Alfred opened a gallery at 291 5th Avenue, in New York City, to show his group’s photographs. He first called it the “Little Galleries of the Photo-Secession”. Later, it became known by the gallery’s street number (“291”). Stieglitz also displayed many painted artworks created by modern artists. The famous New York Armory Show of 1913 is often considered to have introduced Modern Art to the United States. Yet, from 1908 until the Armory Show, Alfred’s 291 Gallery held the first showings of work by the modern artists Henry Matisse, Toulouse-Lautrec, Henri Rousseau, Paul Cézanne, Auguste Rodin and Pablo Picasso. These were some of the leading Modern Artists of those days.
It was because of the 291 Gallery that Stieglitz met and married the famous artist, Georgia O’Keeffe. Before Georgia became a famous artist, she sent some of her pictures to a friend of hers, who lived in New York. Georgia told her friend not to show the pictures to anybody, but her friend became so excited about Georgia’s art that she took the pictures to Stieglitz. Alfred expressed his joy in the discovery of this unknown artist’s work by calling the pictures “the purest, finest, sincerest things that have ever entered 291 in a long while!”
Alfred exhibited Georgia O’Keeffe’s work without her permission. When Georgia found out what he had done, she stormed into 291 and demanded an explanation. Stieglitz explained that her drawings were so wonderful that he simply had to exhibit them. Following a heated argument, Georgia finally decided that having her artwork displayed at 291 did have some advantages. The two artists then had lunch together and a relationship began that led to their marriage, in 1924.
Georgia O’Keeffe
By Alfred Stieglitz
(1918)
It is considered that Alfred Stieglitz’s best photographs are the 400-print series of his wife (Georgia O’Keeffe) and his studies of cloud patterns, which suggest emotions (MOOD). Alfred broke down the barriers against photography in American Art Museums. His prints were the first photographs accepted as “Art” by major museums in Boston, New York City and Washington, D.C. In these museums, his photographs were hung and exhibited in the same way as other painted or sculpted works of great art.
Alfred’s wife, Georgia O’Keeffe, inspired his most monumental project, a psychological and physical composite portrait of multiple images that would follow Georgia through her lifetime, capturing different facets of her personality, varying moods and changes over time, by photographing the whole and fragmented person. Some pictures show only Georgia’s hands or neck. For twenty years, from 1917 to 1937, Stieglitz produced hundreds of photographs of Georgia.
(*For additional information on Alfred Stieglitz and Georgia O’Keeffe see Packet 21. Georgia O’Keeffe, in this #3 Rotation)
Suggested Dialogue
A SERIES, in painting or photography, is a group of pictures, created by an artist, of the same SUBJECT. Subjects may vary from buildings, (lighthouses, barns, houses, or churches) to people (children, movie stars, families), and just about anything in between. An artist might number the pictures in a series, by including the number in the title, or each picture might have its own, uniquely different name.
Alfred Stieglitz’s wife was the famous artist, Georgia O’Keeffe. Bring in an example of a Georgia O’Keeffe painting. Georgia and Alfred were artists using different MEDIUMS. Georgia chose paint; Alfred used film, to create beautiful works of art.
What are some other types of MEDIUMS an artist might use? Types of paint: watercolors, oils, acrylics, tempera. MEDIUMS for sculpture: clay, stone, papier mâche, wire, Styrofoam, aluminum, old junk or “found objects” (broken toys, twigs, shells, spoons). Drawing MEDIUMS: crayon, markers, pencil, charcoal, oil pastel, chalk. Artists are only limited by their own imaginations. An artist could even do a finger painting using chocolate pudding as a MEDIUM, instead of actual finger paint.
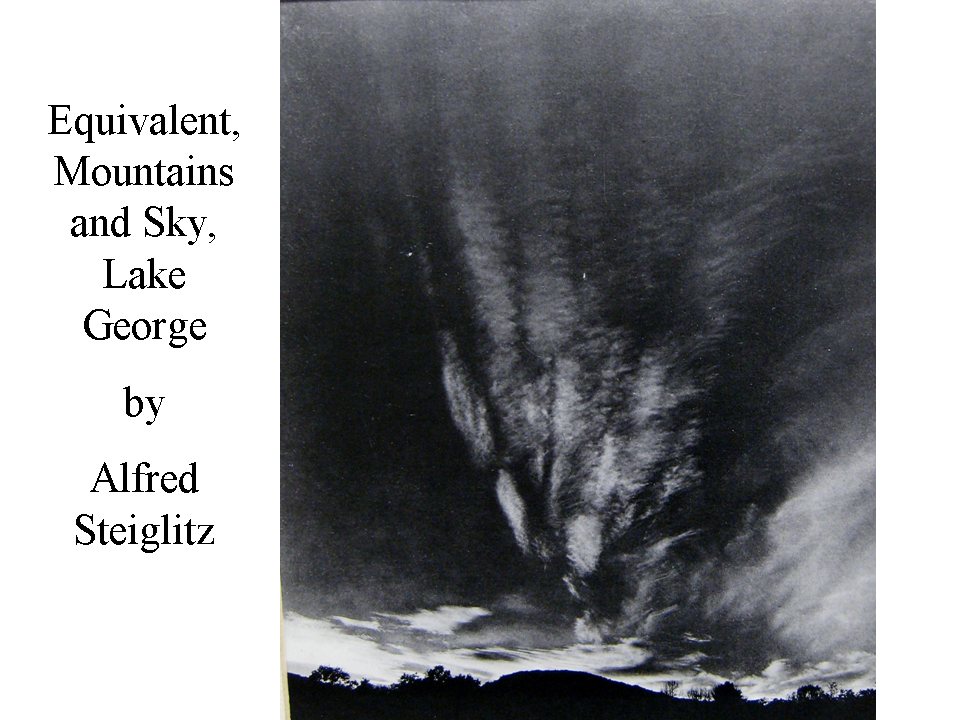
Equivalent, Mountains and Sky,
Lake George
(1924)
Alfred Stieglitz
About the Artist
Clouds had long been an interest of Alfred Stieglitz, since his childhood, when he wrote diary entries describing weather conditions and cloud formations. Stieglitz set out to explore what he had learned about photography, in the 40 years he had been a photographer, by taking a series of pictures with ABSTRACT cloud images. A series is an entire group of pictures with different views of the same subject—like dogs, cats, lighthouses, children, trees, etc. The decision to start a series was motivated by a comment from a critic to a 1921 Exhibition of Alfred’s photographs. This exhibit had included recent photographs of artists and writers and 50 pictures of his wife, from his “Georgia O’Keeffe” project series. The critic suggested that these photographs were so successful only because the subjects were so interesting. Stieglitz took this comment as a challenge to prove that great photographs could be made from very simple, ordinary subjects. The simple, ordinary subjects Alfred chose to photograph, in order to prove the critic wrong, were clouds.
The cloud abstractions (abstractions because they were not solid and unchanging realistic objects) were called “Equivalents” by Alfred because they were equivalent to his deepest thoughts and deepest emotions. In the fall of 1922, at the age of 58, Stieglitz began the cloud series and, over the next eight years, produced over 350 prints of “Equivalents”. His powerful cloud pictures are considered among the BEST of all of Alfred’s photographic work.
The clouds posed unique problems and opportunities. Stieglitz photographed a rectangle of LIGHT, DARK, SHAPE and TEXTURE, a slice of the sky, to become a work of art. A major decision with these cloud pictures was which side to label as “up” when the picture showed no horizon. Since ancient times, artists have communicated emotions through the direction of LINES in their artwork. HORIZONTAL LINES suggest stability, harmony and serenity; DIAGONAL LINES suggest instability and dynamic movement; VERTICAL LINES create feelings of vertigo (a person feels as if they are whirling high and far away) and spiritual awe. The soaring Gothic Cathedrals created the same feelings, using tall, vertical LINES. Artists often use rounded forms to express wholeness and oneness with the universe. The same photograph could suggest several different meanings, just by changing which direction was “up” in the picture. Sometimes Stieglitz played with turning his cloud equivalents around and getting the reactions of a viewer toward each different direction.
About the Art
While this “equivalent” photograph shows clouds and sky, it also shows a HORIZON. The horizon is in the FOREGROUND, or bottom, of the picture. This is an unusual perspective, since most horizons in a LANDSCAPE are in the BACKGROUND. The horizon is a black silhouette of hills, trees and bushes.
Point out the way most of the clouds are gathered close to the Horizon.
Project Ideas
• Turn a large piece of gray or light blue paper vertically. Create clouds using thinned white tempera paint and crumpled paper, dipped, then pressed on the paper. Press the crumpled paper on a piece of scrap paper first, before pressing it on the colored paper, to remove some of the paint. Clouds can also be created with pieces of sponge, using the same technique. Another way to create clouds is to make a quarter sized puddle of thin, white tempera paint, near the bottom of the paper. Next, use a straw to blow the paint towards the top and sides of the paper, to create thin, wispy cloud streaks. After the clouds have been painted, use black paper to cut a narrow horizon outline, to glue at the bottom of the page. Include hills in your horizon; older kids can include a tree SHAPE or two.
• Additional variation of the above idea is to use black tempera paint to create the horizon after the clouds have dried. Use toothpicks for painting small tree silhouettes.
Dorothea Lange
Dorothea Lange was born in Hoboken, New Jersey, on May 25, 1895. When she was seven, Dorothea contracted Polio, which left her with a withered lower right leg and a noticeable limp. Dorothea considered herself “crippled” by the limp and saw it as a major factor that influenced her life and her personality. It bothered her very much to be partially crippled. In Dorothea’s later life, the limp may have helped her career by making strangers more receptive to and accepting of her, whenever she was photographing them.
At Dorothea’s high school graduation, her family asked her what she planned to do with her future. Dorothea announced that she was going to become a photographer. This was strange and unexpected to her family because Dorothea had never OWNED a camera, or even taken a picture! Dorothea explained that her mind had just “made itself up”. The decision stuck and Dorothea went on to study photography with a well-known New York portrait photographer. It wasn’t long before Dorothea learned how to use a camera, develop film, make prints and run a studio. She always considered herself a self-taught photographer, though.
Finally, Dorothea was confident enough with her abilities that she decided to travel around the world to learn more about people and practice her photography. When she was 22 years old, Dorothea left New York with her best girlfriend. The two of them made it as far as San Francisco, California, when a pickpocket stole all of their money so they were stuck there until they could earn some money. Dorothea got a job right away, in a department store, and joined a camera club. She met and became friends with many photographers and artists in San Francisco. One of those friends offered to loan her enough money to start up her own portrait studio. Dorothea was thrilled to have the chance to run her own business. She soon became very successful making unusual portraits of wealthy mothers and their children. Dorothea’s friends came over to her studio every day after work. One of the friends was a well-known western painter of the time, named Maynard Dixon. Dorothea enjoyed Maynard’s company and they soon fell in love and married, in 1922. They had two sons named John and Dan.
Dorothea lived during one of the unhappiest times in American history—The Great Depression of the 1930’s. Her photographs from that period are some of the best-known and most powerful pictures of the twentieth century.
The Great Depression began in 1929 and lasted more than ten years. No one had any idea that it was coming or how the Great Depression would change their lives. The Depression was a time when, almost overnight, millions of people in the United States lost their savings, jobs and homes. Part of the reason it happened was that too many people borrowed and invested their money unwisely. When it was time to pay the money back, people found they didn’t have enough. Families sometimes had to sell their houses, farms and cars. Since nobody had very much money to spend, many factories and stores also closed, and things kept getting worse. When the businesses closed, the people who had worked there suddenly had no jobs to buy food for their families. Suddenly there were many more people without jobs than there were jobs to fill.
At the same time, a terrible natural disaster was happening in Oklahoma and the states close to Oklahoma. It was a gigantic drought, which lasted so long that farmers in the area could not grow any crops to make their living with. The land was so dry that, when it was windy, the dust blew everywhere and sometimes you couldn’t even see through it. The area of the United States that was affected by the drought came to be known as “The Dust Bowl”. Because the farmers had no way to earn money, many of them lost their farms and had to move to find work to feed their families.
In 1933, during one of the worst years of the Depression, Dorothea noticed from her studio window, dozens of men who were out of work. They were standing in a breadline, waiting for a free meal. Dorothea decided to go out and photograph them. One of the pictures she took was White Angel Bread Line. Dorothea put a print of it up on the wall of her studio. When her friends asked her what she was going to do with the photographs of starving, homeless people, Dorothea told them she had no idea. All she knew was that she had to take more pictures to show what a serious problem The Great Depression was.
Dorothea spent more and more time outside her comfortable studio, taking pictures of victims of the hard times the Depression had caused. She often went to dangerous areas to photograph people who were tired and sometimes angry. One day a friend suggested that Dorothea should have a show of all the remarkable photographs she had been taking. So, in 1934, she had her first show, at a small California Gallery. This exhibit was the first time many people had seen Dorothea’s photographs. One person who saw her exhibit was a man named Paul Taylor. He thought Dorothea’s pictures would be perfect to go along with some articles he was writing. Paul was a college professor who was studying the problems people were having because of the Depression.
Paul Taylor asked Dorothea if he could use one of her photographs for a government report he was writing. He asked her to go along and work with him. Dorothea agreed to use her skills to help record The Great Depression. Dorothea and Paul made a great team. They worked hard gathering information from many of the thousands of migrant families who arrived in California everyday from the dust bowl areas of the United States. Most migrants were ordinary people who had lost their farms and homes. They were forced to travel all over the country, looking for jobs picking fruit, vegetables or cotton. Migrants were usually so poor that they often had to live in old tents or cardboard boxes, without heat, running water or much food. Dorothea worked as a photographer for the Farm Security Administration (FSA). The FSA photographers were originally considered Documentary Photographers. A documentary photographer takes pictures in order to create an historical record of a time or event. Several talented and artistic photographers began and developed their famous artistic careers as FSA photographers, during the Great Depression. Dorothea was one of these talented photographers.
Dorothea Lange’s best-known photographs show the farm people and families who were most affected by the Great Depression. In her photography, Dorothea saw the inner strength of the people who were pushed to their own personal limits. Even when she photographed men and women in desperate economic, social and emotional circumstances, Dorothea captured their inborn human dignity. She had a way of picturing people in a caring, sensitive way that had rarely been seen before. Dorothea also saw in her subjects what she called “…courage, real courage. Undeniable courage… I encountered that, many times, in unexpected places. And I have learned to recognize it when I see it”.
Dorothea and Paul sent their reports and photographs to Washington, D.C. The United States government used this information to convince more fortunate Americans that the migrant families needed help. Dorothea’s photographs, which also appeared in newspapers and magazines, helped create support for government relief programs to help migrant workers and their families.
In 1935, Dorothea divorced Maynard Dixon and married Paul Taylor. She lived to be seventy years old and spent most of the rest of her life traveling around the country with Paul, photographing people in America who were very poor and were treated unfairly. Dorothea wanted to make sure no one would forget about them. She recorded people “caught in the pressure of great forces, both of natural and human origins beyond their control”. Dorothea identified with the people she saw pushed to the edge by circumstances and found in them heroic courage and dignity. She loved her work. A quote from her gives us an idea why she was such a great photographer. “One should really use the camera as though tomorrow you’d be stricken blind. To live a visual life is an enormous undertaking. I have only touched it, just touched it”.
Dorothea Lange died of cancer, in San Francisco, in 1965. Another great American photographer, named Ansel Adams, was a lifelong friend of Dorothea Lange.
Suggested Dialogue
• Considering Dorothea’s quote (from above) What kinds of things that you see today would you miss, if you were SUDDENLY stricken blind tomorrow? You may need to suggest a few things that you feel are beautiful, such as a sunset, ocean waves on the beach, etc., in order to encourage this discussion.
• What did Dorothea mean by “…I have only touched it, just touched it”? She probably had countless more ideas of photographs she would like to take in her lifetime, but knew there were too many to be able to take all of them. She wanted to encourage people to pay more attention to all of the beautiful things around them.
• What is a Documentary Photographer? Takes pictures in order to make an historical record of a time or event
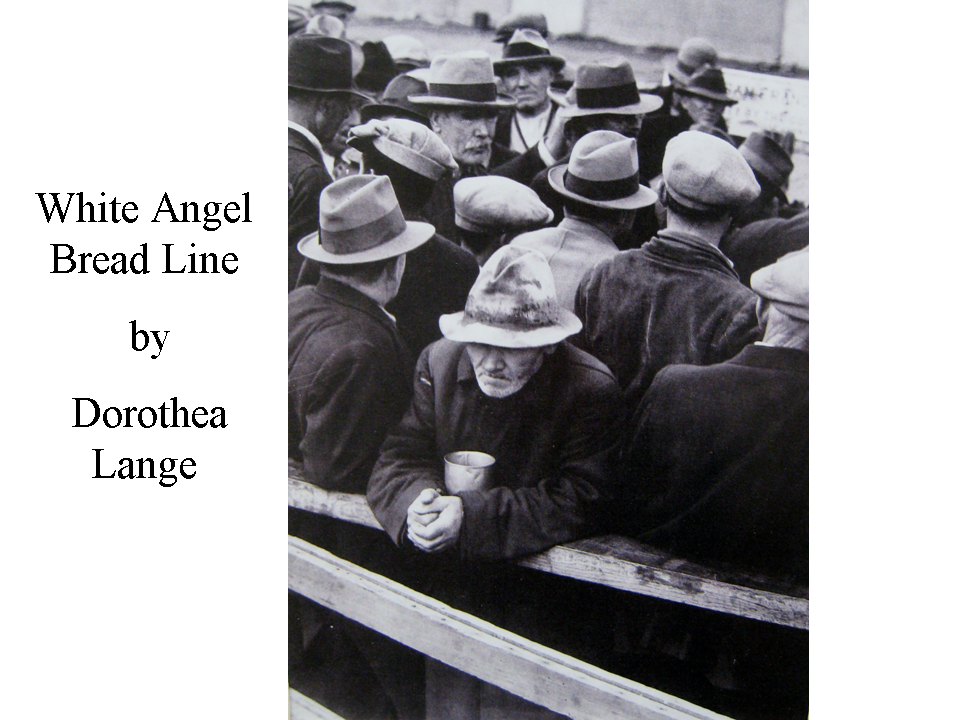
White Angel Bread Line
By Dorothea Lange
This is a photograph of the scene that Dorothea noticed out her San Francisco studio window, in 1933. This was one of the worst years of the Depression. Dorothea hung this picture on the wall of her studio. These men are standing in a breadline, waiting for a free meal, and have probably been out of work for awhile, so they have no money to buy food for a meal. We can’t see the faces of most of the men because they have their backs to us and are also wearing hats. The man in the front center is standing against the rail, facing us. We can’t see his eyes but we can see his sad expression. The man clenches his hands together and holds a cup, or a tin can, in front of him. His hat is worn, tattered and dirty. The sleeve of his coat is torn and he has not shaved for awhile because we can see a short white beard on his face. This lets us know he is not a young man. There are many other men standing in the line behind this man, yet, it is almost as if the man is alone in an ocean of hats and faces.
This is a very powerful image, filled with emotion. What type of MOOD does this photograph create? Desolation, despair, hopelessness, sadness, weariness, isolation
What might this single man symbolize? The aloneness that each of these men must feel in the harsh days of the Depression and in the humiliation of having to stand in a line for free food, because they can’t find work.
The camera is able to show strong emotion much more effectively than paint. Artists want to create feelings or MOODS for viewers of their work. Although this is not a pretty picture, it is a work of art because it is so emotionally charged. It creates a strong MOOD for the viewer. The art world originally did not consider photography a work of art, because the critics felt that something created by mechanical means was not truly created by an artist. Great photographers, like Alfred Stieglitz, Dorothea Lange, Ansel Adams and Ray Atkeson, made the world realize that the artistic eye of the photographer was what made a photograph a work of art. Truly talented photographers show us new ways to look at things, with the eye of the artist.
Project Ideas
• Bring in stacks of catalogues and magazines to use for creating a MOOD collage. Have kids look through these to find several photos of people showing emotion (like excitement or sadness). Glue the photos to a page with a color that fits the emotion(s) being depicted (like blue for sadness or yellow for happiness). To visually show two conflicting MOODS, divide the page in half by creatively gluing a second color to the background. Cut out large letters and attach them to create words that describe the feelings or emotions that the photos illustrate. Cut additional GEOMETRIC SHAPES, using additional colors that will help create the MOOD the collage should create.
• Create an interesting cardboard background, ahead of time, using basic art elements (LINE, SHAPE, COLOR, PATTERN, TEXTURE, SPACE, etc) that evoke a MOOD. Have kids take a solitary photo of a partner (or partners) using facial expressions that will help the photo create that MOOD. Challenge kids to use creative Asymmetrical BALANCE as they set up their photos. You might create two different background MOODS, to help the project move faster. (Abstract Confetti, on a contrasting background, creates a happy MOOD, to give one example.) You might divide the class to create different backgrounds representing MOODS assigned to each group. Be sure to have enough discussion beforehand about ways that basic elements can be used to change a MOOD in a picture. With this idea, you would return on another day for kids to take their pictures, against their choice of background. Photos with only one person will help create a different MOOD than photos of a small group, or a crowd. It is not important that every person be in every picture. You want to create unique photos! The important thing is that kids have a chance to design and take their own photo. Letting kids create the background themselves can focus on how concepts of COLOR, VALUE, LINE, SHAPE, SPACE, PATTERN, TEXTURE, or CONTRAST can create MOOD, while the picture taking itself will focus on BALANCE.
*Discuss the concept of symbolism with older kids. Second (maybe even third) graders and younger will not fully understand such an abstract idea yet.
Migrant Mother
By Dorothea Lange
This is a photograph of a hardworking farm mother. She has just lost her home and her farm. This mother looks concerned and serious, but not necessarily sad. She has wrinkle lines in her face but she is only in her early 30’s. Life on a farm in the Oklahoma plains was hard. A young baby is asleep in her lap and two older boys have their backs to us, learning on her shoulders. The two boys may symbolize all of the worries weighing heavy on this mother’s shoulders.
What do you think “worries weighing heavy on this mother’s shoulders” means?
Why do mothers worry? It’s important to protect and take care of their children. Even cats worry about their young.
How do you think this mother feels right now? What might she be thinking? You can almost feel how worried this mother is about her children’s future and where they are going to get their next meal.
The woman does not seem aware that her picture is being taken. The photographer has captured a quiet, private moment in this woman’s life, which many people might understand. One reason this picture became such a prized photo was that the photographer was able to make us feel emotion when we look at it. The photograph creates a MOOD for the viewer. No matter what their circumstances, all people feel emotions, even if they do not always show.
What kinds of emotions do you feel when you look at this picture? Stress, exhaustion, sadness, helplessness
This famous photo is now considered an ICON (symbol) of The Great Depression and the strength of Americans during those hard times. The original photograph now hangs in the Library of Congress, in Washington D.C. The woman in the photograph was named Florence Thompson and these were her real children. When Dorothea Lange arrived to photograph at this Migrant Camp, the workers had all traveled there to pick a pea crop that was ready for harvest. Unfortunately, during the night, the weather froze and the pea crop was ruined. There was no work the next morning. This meant that there would be no money to buy food or gas that would enable the workers to move on to the next work camp. Dorothea saw many of the workers picking and eating the ruined, frozen peas, with their families, because there was nothing else to eat and they had no money to buy any more food.
In 1960, this is what Dorothea had to say about taking this picture: “I saw and approached the hungry and desperate mother, as if drawn by a magnet. I do not remember how I explained my presence or my camera to her, but I do remember she asked me no questions. I made five exposures, working closer and closer from the same direction. I did not ask her name or her history. She told me her age, that she was thirty-two. She said that they had been living on frozen vegetables from the surrounding fields, and birds that the children killed. She had just sold the tires from her car to buy food. There she sat in that lean- to tent with her children huddled around her, and seemed to know that my pictures might help her, and so she helped me. There was a sort of equality about it”.
(From: Popular Photography, Feb. 1960)
Project Ideas
• Write your own story about what you think happened to this woman’s life, after Dorothea Lange left the camp. Where did the family find work? Where did they eventually live? What good or bad things happened to them? Title your story “Florence Thompson and her Children—the Rest of Their Story”.
• Check out a copy of “The Grapes of Wrath”, to let 4th or 5th graders see what life was like for these kids and their mother. Show a scene from the movie that depicts life in a migrant camp. There are many of these short scenes throughout the movie. A great example is the scene where all the hungry kids are watching Ma Jode cooking dinner for her family around the fire, at one of the first migrant camps the Jodes drove into on their way to California.
• A modern story, which includes photos, poems and interviews with nine children, reveals the hardships and hopes of Mexican American migrant farm workers and their families today. This book is called Voices from the Field—Children of Migrant Farmworkers Tell Their Stories, by S. Beth Atkin, published by Little, Brown & Company, 1993. These stories are interesting to compare with what happened to working class Americans during the 1930’s Depression. Many of the same feelings and prejudices about migrant farmworker families, which existed during the 1930’s, still exist today.
• Create a very different black and white portrait with newspaper. Notice how the different types of print create different PATTERNS, TEXTURES and VALUES. Cut out a solid SHAPE, for the head, neck & shoulders, from a sheet of newspaper. Cut out small bits of darker newsprint (found in photos or advertisements) and glue them close together, to create darker hair. Use old yellow pages to create blonde hair. Cut out eyes, eyebrows, nose and lips from different types of print, which CONTRAST the print on the face, when glued down.
Ansel Adams
Ansel Adams was born in San Francisco, California, on February 20, 1902. He grew up on the sand dunes above the Golden Gate, surrounded by the beauty of nature, from his earliest childhood. Ansel took an early interest in music and became a self-taught pianist. His parents hired piano tutors and his skills eventually developed to the level of concert pianist.
In 1916, when he was 14, Ansel’s father gave him his first camera. It was a Brownie Box model made by Kodak. That summer Ansel and his parents took a vacation trip to Yosemite National Park, in California. It was the first time Ansel had seen the mountains and lakes of Yosemite and he fell in love them and took many photos to bring home from his vacation. From that time on, the park, nature and the high Sierras became one of his major interests. Later in his life, Ansel lived year-round in Yosemite and he continued to visit the park every year throughout his lifetime.
When Adams graduated from high school, he worked as an apprentice for a photo finishing company, in San Francisco, for two years. Ansel became interested in preserving wilderness areas and became active in the conservation movement. His next job was a custodian for the Sierra Club, in Yosemite National Park. The Sierra Club was organized as a non-profit, public trust, devoted to the study and protection of national parks and wilderness regions. Ansel took many photographs of Yosemite and explored all over the park’s beautiful mountains. His photographs were printed in regular editions of the Sierra Club’s bulletin, which gave the general public a chance to recognize Adams’ photographic work. While he was living in Yosemite, Ansel continued to play the piano. Harry Best, who owned the Best Photographic Studio, in Yosemite, often let him pay the piano in his home. Adams later married Harry’s daughter, Virginia Best, in 1928.
In 1920, Ansel decided to become a professional musician. He gave concerts and piano lessons until 1927, when the publication of his first portfolio of pictures earned him wide critical acclaim. In 1930, at the urging of many who admired his work, Ansel changed his mind and decided to become a professional photographer. He worked hard on his photography and became as proficient at it as he was in music.
Adams’ favorite photographic subjects were the wilds of the American west. Nature was the inspiration in his photographs. Ansel’s photographs of western scenes won him wide recognition as a poet-photographer of nature. Adams was a leading supporter of straight photography, a style featuring detailed, focused photos that portray subjects simply and directly.
In 1941, Ansel Adams was appointed photomuralist for the Department of the Interior, in Washington D.C. His job was to make large landscape photographs of National parks and Monuments, in different areas of the U.S., for the walls of the Department of the Interior building, in Washington D.C. The assignment was dropped when the United States entered World War II. Many copies of these Mural Project photos are still popular can still be found in picture framing or poster stores today.
Adams suffered from heart problems the last ten years of his life. He lived with a pacemaker for several years, before he died of heart failure on April 22, 1984, at the age of 82. Since his death, public recognition of his achievement has continued and publications of his life’s work still thrive. The California Wilderness Bill, strongly supported by Senators Pete Wilson and Alan Cranston, designated over 100,000 acres in the Sierra Nevada Mountain Range as the Ansel Adams Wilderness area. Mt. Ansel Adams was officially named in the Yosemite National Park, in 1985, as a tribute to a man who so loved the great peaks that he dedicated his life to their inspiration.
EXAMPLES
MOUNT WILLIAMSON, SIERRA NEVADA FROM MANZANAR, CALIFORNIA
(1944)
Ansel Adams
This is a LANDSCAPE photograph. What do you see in the FOREGROUND of the picture? Large boulders
What can you see in the MIDDLE GROUND? More boulders, only these get smaller as your eyes travel towards the BACKGROUND. This happens naturally in a photograph. If an artist were to paint a picture of this exact scene, he would have to artificially create PERSPECTIVE or DEPTH by painting the far away rocks smaller that the ones in the FOREGROUND.
How did Ansel Adams use PERSPECTIVE as a tool to make this photograph artistic and interesting? Instead of taking only a picture of the mountains covered with clouds and streaming sunlight, he concentrated on the interesting and unusual terrain, in FRONT of the mountains (FOREGROUND). The mountains play a less important role in the entire picture because the boulders take up two thirds of the entire photograph. Often photographers pay more attention to the far away mountains than to the land below the mountains. The unusual perspective of this Landscape is one of the reasons this photograph is considered a work of art.
Project Idea
• Create a torn paper landscape patterned after this photograph. Begin with a sheet of blue paper, placed horizontally, for the sky. Tear the BACKGROUND mountain shapes from 1/3 sheet (horizontally torn) of gray, darker blue, purple, green or lavender paper. Glue the mountain range to the top third of the blue paper. Next, tear small, irregular rock shapes of brown, tan and gray. Glue these on the picture at the base of the mountains and down, towards the bottom of the paper. Do not let the blue show through the rocks. Layer more small rocks over any blue spaces. Tear the irregular shapes so that they get progressively larger as they reach the bottom of the paper, to create the largest rocks in the FOREGROUND. Tear apart a cotton ball, or small piece of cotton batting, to glue in the sky and the tops of the mountain peaks, for the look of feathery clouds.
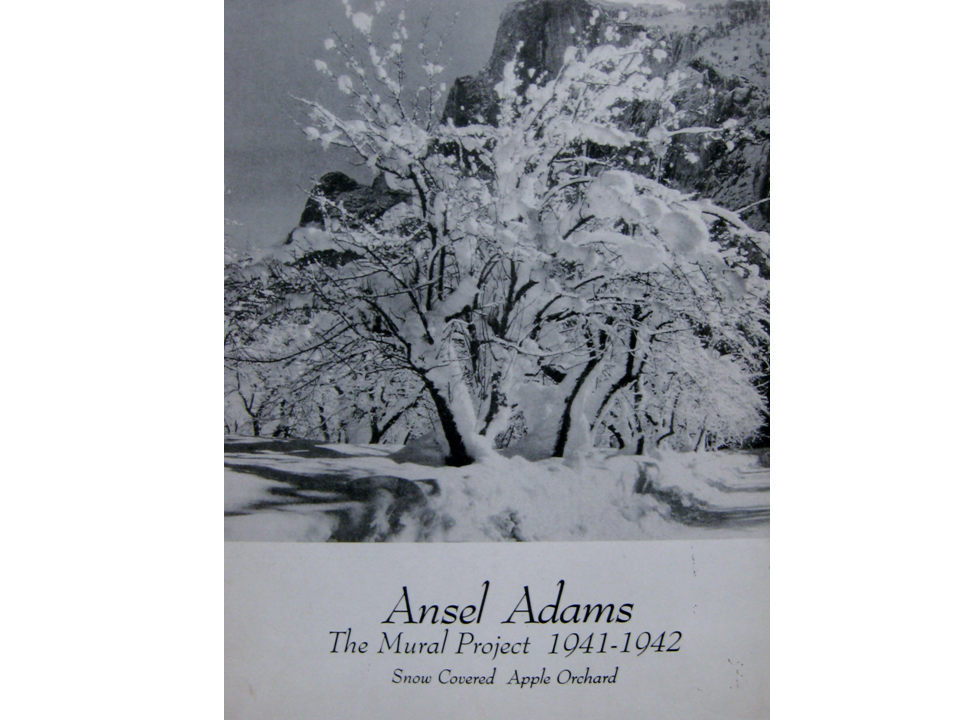
Snow Covered Apple Orchard
The Mural Project
Ansel Adams
In this photograph, we can see tall mountain peaks in the distant background. Most of the picture is a single apple tree, with its branches covered in snow. The tree is in an apple orchard and as we look a little closer, we can see there are more snow-covered trees behind.
Can you find any LINES in this photograph? What kinds of LINES are they?
Horizon LINE, where the mountain peaks meet the sky—vertical, diagonal, and horizontal LINE in the tree trunks and branches—Curved shadow lines to the left of the tree, in the snow.
Point out how the snow sits along the tops of the branches and how the dark CONTRAST of the branches create LINE.
Project Idea
Create the illusion of a black and white photograph with a snow covered tree picture. On a piece of light gray paper, draw a simple tree shape with a black crayon. Be sure the tree has many branches. Tear white paper to create snow at the base of the tree and snow on the tops of the branches. Create sparkling snow by gluing salt or clear sparkles. Refer to pictures of leafless trees and discuss progressive RHYTHM found in tree branches.
Looking at Ansel Adams Photographs
Ansel Adams
El Capitain, Merced River, Against Sun, Yosemite, CA, ca. 1950
Ansel Adams
Aspens, Northern New Mexico, 1958
● How did Adams compose each photograph?
● What is in the foreground? Middle ground? Background?
● What lies outside of the frame?
● Where is the light source?
● Was the picture taken in bright or soft daylight?
● How does the light effect the contrast of the picture? (high contrast is very dark blacks and very bright whites; low contrast is more gray tones, more muted brights and darks)
● Do you think he altered the photograph in the darkroom? For instance, did he make the sky darker? Why would he do this?
● If you had to choose three words to describe each of these photos, what would those words be?
● What textures do you see?
● Does our world today look different than this?
● Have you ever been to a place in nature like this? Was the place significant to you?
● If you could describe that place in three words, what would they be?
Brownie Box Cameras
In 1916, when Ansel Adams was 14, his father gave him his very first camera. It was a Brownie Box model, made by Kodak. This started Ansel’s interest in photography, which led to his successful career a photographic Landscape artist, years later.
The Brownie camera was introduced in February 1900, as an entry-level camera, meant for children to use. The camera was designed and manufactured for George Eastman by Frank Brownell, who produced all of Eastman’s cameras. Brownell’s firm ultimately became part of the Eastman Kodak Company, in 1902. The camera was named for the Palmer Cox Brownie cartoon character and sold for $1.00. The film for the brownie was a six-exposure roll that for .15 cents. Most of these first Brownies were sold in England. The earliest camera had a design problem—the loading release was flimsy and its slide-off back had a loose fit. The back was redesigned in April 1900, and replaced by a bottom-hinged back that locked.
The demand for the Brownie was so great that the company couldn’t keep up with the orders. Sales were much greater than anticipated. Some dealers sold more than 100 cameras a week and the first-year sales of the Brownie was more than 150,000 cameras. The no. 2 Brownie, which produced 2 ¼” x 3 ¼” images on 120 film, was introduced in October 1901. The Brownie family of cameras eventually would include more than 100 models, which were marketed into the 1960’s. (If you own one, bring in an old Brownie model camera. Sometimes you can find these at Thrift stores or garage sales.)
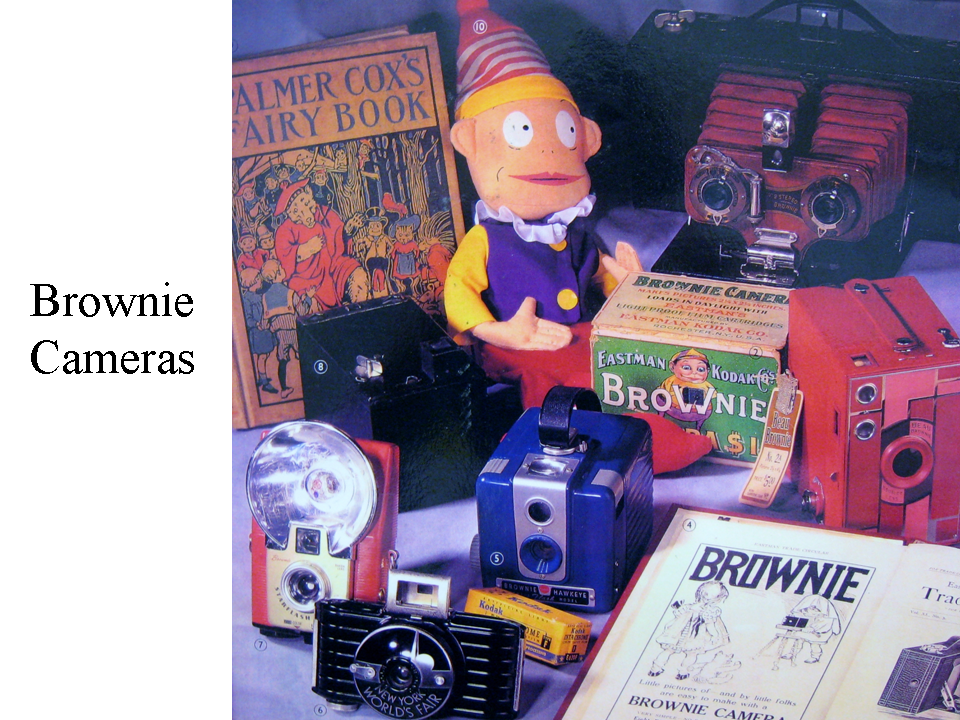
PICTURED IN ORDER (beginning top right): 1) No. 2 Stereo Brownie model A, circa 1905.
2) Brownie camera box featuring “Brownie” cartoon character, circa 1900. 3) No. 2A Beau Brownie camera with original price tag, circa 1930. 4) Kodak Trade Circular (Advertisement), 1910. 5) Brownie Hawkeye Six-20 flash model (prototype) and a roll of Ektachrome film, 1951. 6) Eastman Bullet camera, New York World’s Fair, circa 1939.
7) Brownie Starflash, circa 1957. 8) Original Brownie with viewfinder, circa 1900. 9) Fairy Book by Palmer Cox author of The Brownies, which the camera was named after), second edition, 1902. 10) Reproduction of original Brownie doll, 1987.
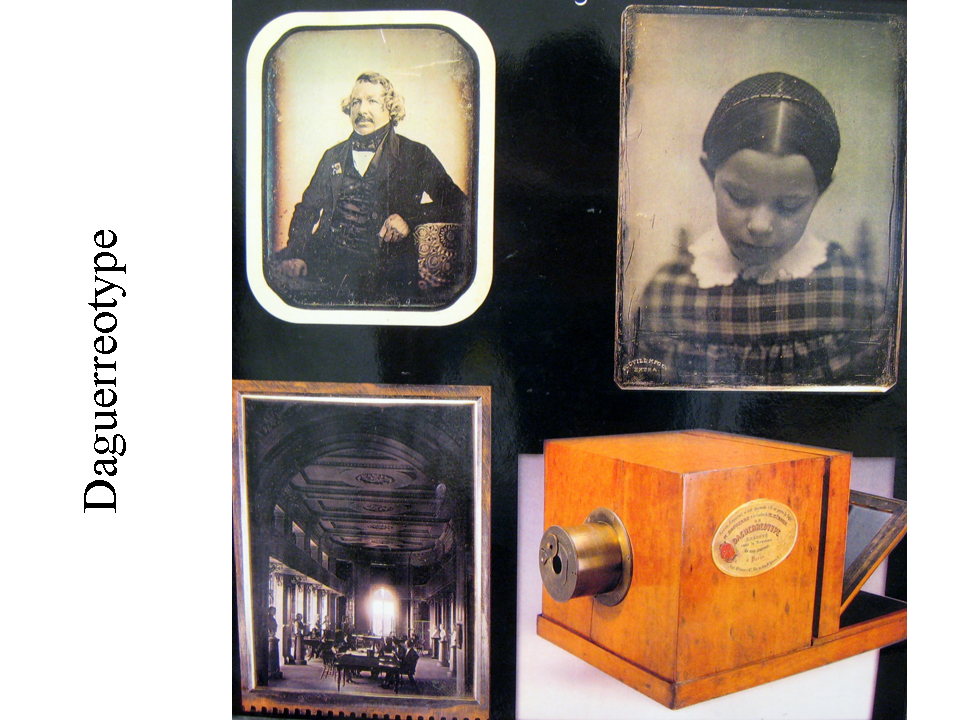
DAGUERREOTYPE CAMERA
PICTURED (STARTING AT TOP LEFT): Louis-Jacques-Mande Daguerre, taken 1844, by French photographer Jean-Baptiste Sabatier-Blot. (TOP RIGHT): Daguerreotype of Marion Augusta Hawes or Alice Mary Haws, circa 1852, by American photographers Albert Sands Southworth and Josiah Johnson Hawes. (BOTTOM RIGHT): Daguerre’s camera (DAGUERREOTYPE) manufactured by Alphonse Giroux et Cie., Paris, France, 1839.
Ray Atkeson
Ray Atkeson was born in Grafton, Illinois, on February 13, 1907. Ray began his career in photography while he was still in high school. After high school, Ray worked in the wheat fields of Kansas and Nebraska and picked apples in the Hood River Valley of Oregon. He was still a young man when Atkeson decided he would again take up his camera to shoot the beautiful scenes he had seen across the country. Atkeson spent the first twenty years of his career photographing in black and white. With his wife, Mira, whom he married in 1929, Atkeson photographed landscapes in Europe, Hawaii and America’s West, with a special emphasis on Oregon, where he and Mira lived for years. (Mira even became a photographer herself.) The Atkesons maintained two homes—one on the Oregon Coast and the other in Portland, overlooking the Willamette Valley, with his beloved Cascade Range on the horizon.
During the 1930’s, Atkeson’s career began to flourish and he was widely published. Work reproduced in newspapers around the United States brought the dramatic mountains and ski country of Oregon and the West to a wide audience of Americans for the first time. Atkeson became especially well known for his stunning black-and-white images.
In 1939, Atkeson began experimenting with Kodak’s new color film. The art of color photography was still in its infancy. For the next fifty years, Ray was a pioneer in establishing the style and character of American Landscape color photography. His images appeared around the world and influenced a generation of photographers.
In the 1950’s, interest in black and white photography was substituted by new color film. Atkeson stored his negatives in a vault, where they remained untouched for nearly fifty years. Toward the end of his life, Atkeson began printing these negatives again, a project that continues today, even after his death, in 1990.
Among the many awards Ray Atkeson received in his lifetime are Distinguished Citizen of Oregon; an Honorary Doctorate of Fine Arts from Lindfield College, in McMinnville, Oregon; the Distinguished Service Award; and the Oregon Governor’s Art Award.
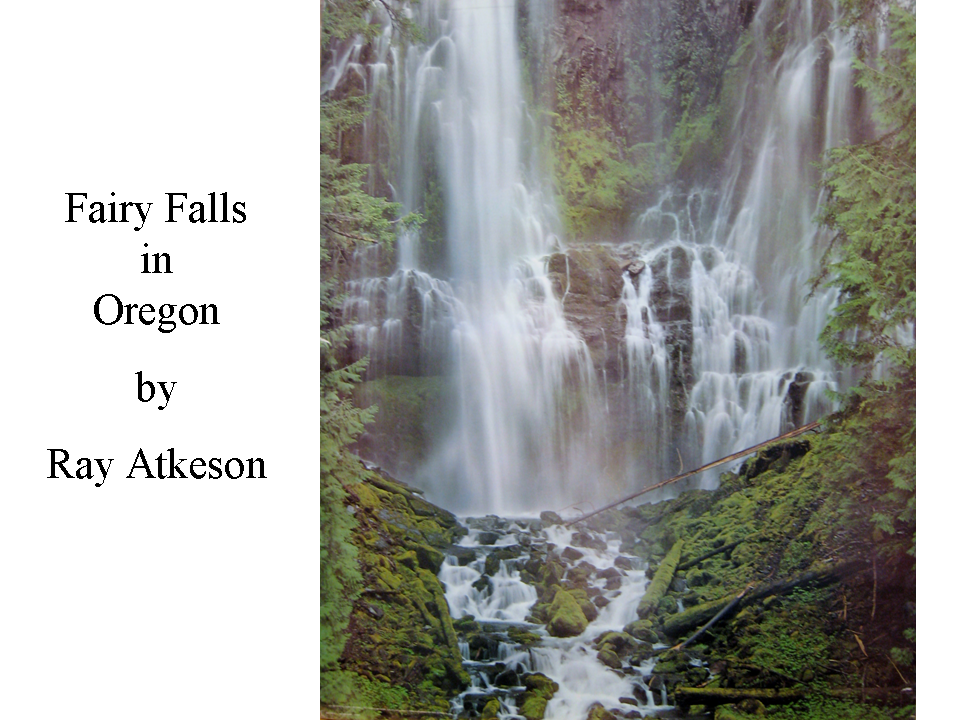
Fairy Falls
A Waterfall in Oregon
By Ray Atkeson
Fairy Falls dances down a lava cliff in the Mount Hood National Forest. Located above Wahkeena Falls, in the Oregon Cascades, Fairy Falls can be reached by a two-mile climb from the Columbia Gorge. This color photograph is framed on two sides by fir branches. The rock wall that the water falls down is called BASALT, which was hot lava laid down in the Columbia River Gorge, thousands of years ago. The green on the basalt wall is thick moss, which grows extremely well from the continual wet mist of the falling water. Many of the fallen logs (in the FOREGROUND) are also covered with moss. Below the falls, the water rushes away in a stream, over the rocks. The falling water is white and resembles cotton.
You might spend some time discussing the volcanic history of the Northwest and how the Columbia River Gorge was formed. Ask the class if they have ever been to Multnomah Falls, in the Columbia River Gorge. It is located on the south side of highway 84 and looks very much like this picture. There are several waterfalls to be seen on the drive along highway 84. Multnomah Falls is the largest, most well known, and the easiest to see.
Ray Atkeson produced the large coffee table books “Oregon” and “Oregon II”. There are colored photographs in these books, showing scenes of the Cascade Mountains, the Columbia River Gorge, and the Oregon Coast, along with the dryer, desert areas of Central and Eastern Oregon. If you can find one of these books in the library, point out a few places that might be familiar to some of the kids.
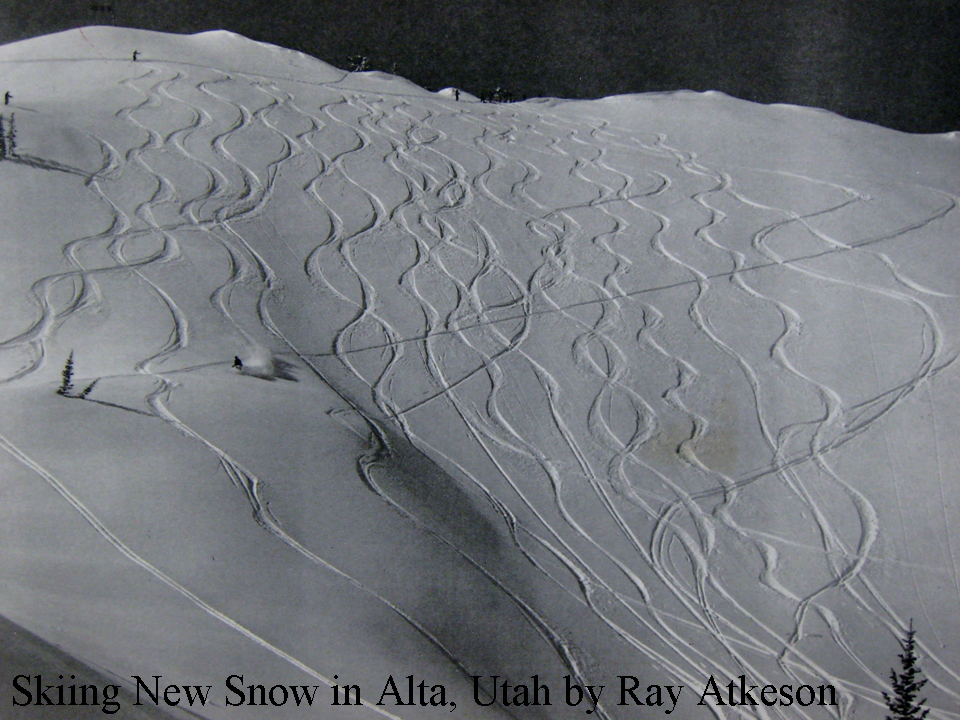
Skiing New Snow in Alta Utah
By Ray Atkeson
Where is the HORIZON LINE in this picture? At the very top of the picture (point along curved edge)
Would this picture be as interesting without the tracks? The tracks left in the snow by the skiers make LINES that create an interesting PATTERN in the snow. There would be a large, blank area of white without the tracks. A PATTERN is more interesting to look at than plain white snow.
What types of LINE do you see in this picture? Curved, diagonal (point)
When you look at this photograph, how do your eyes travel (what kind of MOVEMENT do you see)? The darker VALUE sky, at the top of the picture, moves our eyes lower into the picture, where we follow the diagonal tracks toward the darker VALUE skiers and trees, near the top left of the slope. The trees keep our eyes from going off the picture, to the left, and move our eyes to the right, where we follow the curving lines down the slope. Notice how most of the LINES curve DIAGONALLY, back and forth, across the photograph. This leads our eyes across the entire picture. From the trees, near the top of the slope, ski tracks and shadow lead our eyes diagonally, back and forth down the slope, towards the darker VALUE tree, in the bottom right corner. The medium VALUE triangle, in the bottom left corner, pushes our eyes back to the right of the picture, towards the tree. The triangle is a shadow on the snow that keeps our eyes from moving off the picture. The photographer has caused our eyes to move diagonally across the picture, like the skiers.
How many pine trees can you see? Do you notice that the trees create a DIAGONAL LINE, from one corner of the photograph to the other, across the entire Landscape? (point)
Can anyone find other shadows on the snow? The trees and the skiers (top left and center left) cast a shadow on the snow. There is also a shadow, near the center of the picture, which indicates a ridge, hill or bump.
Project Ideas
• Tear off about 1” off a piece of white construction paper, to create the top of a ski slope. Glue this to a gray or blue background (for the sky at the top of the slope). Most of the picture will be the large, white slope. Use white glue, sprinkled with salt, to create PATTERNED LINES down your ski slope. When the lines dry, draw skier silhouettes along some LINES, with a black pen or pencil. Add a few pine trees. Small bits of cotton glued behind the skiers can give the impression of snow flying behind them (like the lowest skier in this photograph).
• Roll out clay and create a sunken relief LINE PATTERN similar to the one created by the skier’s tracks in the snow, using LINES that are curved and diagonal (no straight or angled lines).
A Good Photograph
Takes Thoughtful
Planning and Practice
Framing
create a Create a paper or cardboard frame to view your potential picture beforehand and get a better idea about how you want it to look. Hold the frame in front of you and look through the center to find the things you want to include or leave out of your picture. Make deliberate choices about what to include inside the picture frame. Be deliberate about where the edge should be. Practice framing several objects or settings in different ways to achieve various visual effects.
After practicing and planning with your cardboard frame for a while, you will have a better idea of what you want in your photograph. Try to take several experimental shots with your camera so that you can learn how to better control what will be seen in your photograph. Experiment with distance and depth by shooting a wide shot and a close up of the same object or setting. Notice that when you get close to an object, the photo becomes more about LINES and TEXTURES and less about the object itself because the object begins to become abstract. Try to create an abstract image by getting very close and cropping out part of the object so that the viewer might question what they are looking at. Have your friend photograph the same object (apple, baseball, green pepper, flower, crumpled shirt) but in a different way. How did the two of you frame it differently? Which view do the two of you prefer? What would you do differently next time?
Vantage Point
Photograph the same subject from different perspectives. How do different vantage points (above versus below, side angle versus frontal view) change the composition of your picture? Does a different perspective change the MOOD of your picture? Unusual vantage points can often be surprising or exciting because they are unexpected, but they might not always work the way you hoped. Experimenting will help you learn which views will work and which ones will not.
Light, Shadow and Texture
Carefully compose your camera shot to get the most intense combinations of all three of these elements. Bright light and dark shadows will make a picture that is high in contrast. More subdued or gentle light will make a picture that is low in contrast. Which do you prefer? Try taking both and see what you can do best. Try to include different textures in your photograph. Examine the photographs from the Art Discovery packet this month and pay attention to the TEXTURES you see. How many different textures can you find?
Some Helpful Art Photography Definitions to Understand:
Background: in a picture, those things that appear farthest away from the viewer
Close up: a photograph or image in which the subject is framed very tight/close
Composition: the act or process of composing; arrangement into proper proportion and especially into artistic form
Focus: a function on the camera lens that makes a subject appear sharp (in focus) or soft (out of focus), depending on the desired effect
Foreground: the part of a scene or representation that is nearest to the viewer
Framing: arranging objects inside the picture frame
Light: the basic element that is in every photograph; light travels through the camera’s shutter to expose the film and create an image
Medium shot: a photograph or image in which the subject is framed with some background (a classic medium shot of a person is from the knees or waist up)
Middle ground: the area of the picture that is in between background and foreground
Vantage point or viewpoint: the point from which the artist seems to be looking when he/she creates the scene or image
Wide angle: also called a long shot, framing the subject from a distance to reveal the background
(Hand-out recommended for grades 4 and 5.)
Eight Tips for Taking Your Best Shot with Nature Photography
1. Scout the area before you begin. Figure out what will make a good picture and when the light will be just right.
2. Shoot photos as the sun comes up and as it goes down, when shadows are broad and colors are intense.
3. Look for COMPLEMENTARY COLORS. Photograph trees with orange leaves against a blue sky or red flowers in a field of green.
4. Search for PATTERNS and SHAPES, such as a row of tree trunks or rocks in a riverbed, to make photographs more dramatic.
5. Try shots with your main subject off to one side, or near the top or bottom of your photo, to create an “off center” BALANCE. Scenes are much more interesting with ASYMMETRICAL BALANCE.
6. Make sure the land and the sky do not always meet in the exact center of your Landscape pictures. Make the picture one-third land and two-thirds sky, or one-third sky and two-thirds land.
7. Use lead-in lines. Compose your photograph with a road, trail, or fence line that starts somewhere out of the frame and runs right into the picture.
8. SHOOT, SHOOT, SHOOT! Take loads of photos. As with any other skill you learn, the more you practice, the better you will become!
Simple Pinole Camera Obscura
From a Pringles® Chip Can
The hardest part of this project is collecting enough Pringles® cans for each person in the class. Send home requests for these cans early in the year, before your school will be using this Packet. An adult will need to cut the chip can for this project ahead of time but the kids (Grades 3-5) should be able to do most of this by themselves. Another option is to use a foam soda can holder as the eyepiece. This will work better for people who wear glasses, although it may cost more.
FOR THE ADULT VOLUNTEER TO DO AHEAD OF TIME:
1. Remove the plastic lid from the Pringles® can and wipe out the inside. Save the lid!
2. Draw a line around the can, about 2” from the bottom. Use an X-acto knife or a utility to cut along this line.
FOR THE KIDS TO DO:
1. Use a thumbtack to make a hole in the center of the metal piece on the shorter bottom piece of the can.
2. Put the plastic lid on the shorter piece of the can. Place the longer part of the can above the lid and tape all the pieces together.
3. To keep light out of the tube, use a piece of aluminum foil about a foot long. Tape one end of the foil to the outside of the tube. Wrap the foil all the way around the tube twice, then tape the loose edge of the foil closed. If there is extra foil at the top, tuck it neatly inside the tube.
In a bright room or outside, close one eye and hold the tube up to your other eye. You want the inside of the tube to be as dark as possible—so cup your hands around the opening of the tube if you need to. Look around through your tube. The lid makes a screen that shows an upside-down color picture!
How Does a Hole in the Bottom of a Pringles® Can Make a Picture of the World?
You’ve made a camera! This kind of camera is called a camera obscura—which is Latin for “dark chamber.” The first camera obscuras were small rooms that were completely dark except for a tiny hole in a wall that let in a dot of sunlight. People in the room saw an image of the trees and sky on the wall opposite the hole—and were amazed when the image disappeared at sunset!
The hole doesn’t make the picture you see when you look in your Pringles® can. The image of the world is always there. All the hole does is make it possible for you to see it.
Suppose you point your Pringles® Pinhole at a brightly lit bouquet of flowers. Light reflects off the red rose, the blue iris, the white daisy, and the green leaves. If you hold a piece of white paper near the bouquet, some of that reflected light will shine on the paper-but it won’t look like anything. That’s because light bouncing off the red rose ends up overlapping with light bouncing off the blue iris, the white daisy, and the green leaves. There are many images of the bouquet on the paper-but they overlap with one another, and the colors all blend together, making a jumble of light.
The hole isolates a small part of the light, sorting a single image from the jumble. Only a few of the light rays reflecting off each point on the rose are traveling in a direction that will let them pass through the hole. The same is true for light bouncing off all the other flowers in the bouquet. On the other side of the hole, these light rays reveal an image of the bouquet.
Thank you for this great suggestion Kelly Brachman!